

Walk into a remodeler’s own kitchen and you’ll notice something odd. The cabinets are usually the originals.
Same boxes the builder hung. Same layout. But the room reads twenty years newer than it has any right to, and you can’t immediately say why.
That’s because the people who tear kitchens apart for a living know exactly which small things carry the visual weight — and which $30,000 decisions buyers never notice. Remodeling’s 2025 Cost vs. Value numbers make the case bluntly: a minor kitchen refresh recoups about 94% of its cost, while a major midrange remodel claws back roughly 44%.
Every fix below lands under $200 in materials. Most are a weekend afternoon. A few are a beer and an hour.
Here are 33 of them.
1. Swap Every Knob and Pull in the Room

Hardware is the cheapest thing in your kitchen that every single visitor physically touches. That’s the whole argument.
A full kitchen’s worth of knobs and pulls — say 28 pieces — runs about $200 in solid matte black, brushed brass, or satin nickel. Buy them in bulk packs of ten and the per-piece price drops under $5.
The trick nobody mentions: measure your existing pull’s screw spacing before you order. Most 1990s cabinets use 3-inch centers, and buying 5-inch bar pulls means drilling 56 new holes you didn’t plan on. The 2025 Cost vs. Value breakdown puts hardware near the top of the return-per-dollar pile for exactly this reason.
Start here. It’s the fastest before-and-after on the list.
2. Replace the Faucet With a Real Pull-Down

You operate this thing thirty times a day. It’s the most-used mechanical object in the house and most people are running whatever the builder bought in bulk.
A plumbing-grade pull-down from Moen, Delta, or Kohler lands around $150 and reads like a $500 fixture. The magnetic docking head is what sells it — cheap faucets use a weighted hose that sags out of the spout within two years.
Budget 90 minutes under the sink and buy a basin wrench first. Without one, the mounting nuts behind the bowl are genuinely unreachable.
3. Run Under-Cabinet LED Strips

The dark shadow line under upper cabinets is the single biggest thing making an old kitchen read as old. Light it and the countertops come alive.
Plug-in LED tape costs $20 to $60 and sticks on with adhesive backing. No electrician, no permit, no drywall.
Pick 2700K or 3000K and mount the strip toward the front edge of the cabinet bottom, not the back. Mounted at the back, it throws a hard glare line right at your eyes off a glossy backsplash.
4. Cut Out and Re-Caulk the Sink and Countertop Seams

This is the one on the list that stops a five-figure problem, and it costs twelve dollars.
Look at the joint where your sink rim meets the counter. Then the seam where the counter meets the backsplash wall. If the caulk there is cracked, peeling, gray at the edges, or missing in a half-inch section, water is already going somewhere.
Where it goes is the particleboard substrate under a laminate counter, then the cabinet box, then the drywall behind. None of that announces itself. It swells slowly, grows mold in the dark, and surfaces as a soft spot in the counter or a musty smell you keep blaming on the trash can.
By the time it’s visible, a contractor is quoting you cabinet replacement plus drywall plus remediation — water damage claims routinely run four and five figures, and a slow chronic leak is often excluded by the insurance policy because it wasn’t “sudden and accidental.” That exclusion catches people off guard every year.
The fix: slice both sides of the old bead with a utility knife, pull it out in one strip, scrape the residue with a plastic razor, wipe with denatured alcohol, and let it dry completely. Then lay a new bead of 100% silicone — not acrylic latex, which shrinks and cracks within two seasons. Tool it with a wet fingertip and keep water off it for 24 hours.
Contractors re-caulk their own sinks every few years on a schedule, the same way you change a furnace filter.
5. Paint Only the Lower Cabinets

Two-tone kitchens are the look right now, which means painting just the base cabinets isn’t a compromise — it’s the design.
Half the doors, half the paint, half the Saturday. You skip the hardest part of a cabinet repaint, which is cutting in around upper cabinets while standing on a ladder with your neck bent.
Degrease with TSP substitute, scuff-sand with 220, prime with a bonding primer like BIN or STIX, then two thin coats of an enamel. Thin coats. Thick ones never fully cure and stay tacky for months.
For context on what you’re avoiding: HomeGuide puts refacing at $80 to $125 per linear foot for laminate and up to $500 for solid wood.
6. Peel-and-Stick Backsplash (With One Honest Caveat)

At $4 to $8 per square foot, peel-and-stick tile undercuts real ceramic — $15 to $25 installed — by a wide margin.
It also has a specific failure mode. Heat and steam break the adhesive down, and the corners lift.
Use it on low-heat walls only. Behind the coffee maker, along a prep run, up a wall of open shelving: fine. Directly behind a gas burner or over a cooktop: skip this. Angi flags the same limitation.
Wipe the wall with alcohol first. Grease you can’t see will kill the bond.
7. Clip Soft-Close Dampers Onto the Cabinet Doors

Slamming cabinet doors are the loudest builder-grade tell in any kitchen. You stop hearing it in your own house. Guests don’t.
Little hydraulic dampers press onto the existing Euro hinge cup — no tools, no drilling, about $1.50 each. A full kitchen runs $15 to $40.
If your hinges are the old face-frame wraparound type, full soft-close replacements are a few dollars a door and still cheap.
8. Rip Out the Fluorescent Box or Flush-Mount Dome

The wraparound fluorescent panel dates a kitchen to within five years of when it was built. So does the frosted glass boob light.
Pull the fixture, cap nothing, and mount a flush LED disc or a pair of semi-flush schoolhouse fixtures. Sixty to a hundred fifty dollars resets the entire ceiling plane.
Kill the breaker, not the switch. And test with a non-contact tester before your fingers go in the box.
9. Replace Yellowed Outlets, Switches, and Plates

Thirty-year-old almond devices next to white cabinets look dirty no matter how hard you scrub. The plastic has oxidized — the color is in the material now, not on it.
Devices run $3 to $6 each. A whole kitchen’s worth, including plates, lands at $60 to $120.
But the real payoff here is safety, not looks. Every receptacle serving a kitchen countertop is required to be GFCI protected, and has been under the National Electrical Code since 1987 — with the requirement widening repeatedly since. A GFCI trips in about 1/40th of a second when current leaks to ground, which is the difference between a startle and a hospital visit when a wet hand meets a frayed toaster cord.
Here’s how to check yours. Look at the countertop outlets: do they have TEST and RESET buttons? If not, they might still be protected downstream from one that does. Press TEST on the GFCI you can find and see which outlets go dead.
- No GFCI anywhere on the countertop circuit
- Two-prong outlets with no ground
- A receptacle that’s warm, scorched, or loose in the box
- Plugs that fall out under their own weight
Any of those, stop and call a licensed electrician. Replacing a like-for-like device is a reasonable homeowner job; diagnosing a missing ground or an overloaded 1960s circuit is not.
10. Drop Pull-Out Shelves Into Two Base Cabinets

Base cabinets are where pots go to die. Anything past the first twelve inches is functionally lost.
A roll-out tray turns that black hole into a drawer. Eight screws, maybe twenty minutes, $40 to $80 apiece.
Buy two, not eight. Pick the cabinet by the stove and the one holding small appliances — those are the ones you fight with daily.
11. Recolor the Grout Instead of Regrouting

Backsplash grout doesn’t go gray from dirt. It goes gray from aerosolized cooking grease settling into a porous cement surface, which is why scrubbing never brings it back.
A grout colorant kit runs about $25 and both re-pigments and seals in one pass. Budget an afternoon and a small artist’s brush.
If any joints are crumbling, rake those out with a grout saw and refill before you color. Colorant over a failing joint just makes a neat-looking crack.
12. Put Every Bulb in the Kitchen at the Same Color Temperature

Open your fixtures and read the bulbs. Odds are good you’ve got a 2700K here, a daylight 5000K there, and a half-dead fluorescent tube somewhere in between.
Mixed color temperatures make the same cabinets look like two different colors across the room. It’s the muddiest-looking problem with the cheapest fix on this list.
Pick 2700K or 3000K and buy them all at once. Thirty to sixty dollars and the whole room snaps into one space.
13. New Sink Basket Strainer and Disposal Flange

The strainer sits dead center in the sink. It’s in every photo, every eyeline, every time you rinse a plate. And it’s almost always pitted, corroded, and twenty years old.
Twenty to forty-five dollars per drain. Match the finish to your new faucet — brushed nickel, matte black, whatever you went with.
Roll plumber’s putty into a rope, seat the flange, tighten from below. Twenty minutes. Nobody will know why the sink looks better.
14. Glue Shaker Trim Onto Flat Slab Doors

This is the highest-skill item here and the biggest visual payoff per dollar on the entire list.
Thin lattice molding — a buck or two per foot — gets mitered into a rectangle, glued and brad-nailed onto a flat slab door, then caulked at every seam and painted. Slab becomes Shaker.
A full kitchen runs $80 to $180 in molding. The miters are the hard part; a cheap miter box and a sharp backsaw will get you there if you’re patient.
Do one door first. If the corners look rough after caulk and paint, you’ve lost four dollars.
15. Swap Rubber Supply Lines for Braided Stainless and Quarter-Turn Shutoffs

Go open the cabinet under your sink and look at the two hoses running up to the faucet. If they’re gray or black rubber with crimped ends, you’re looking at the most common way a kitchen floods.
Rubber supply lines age from the inside. The reinforcing braid weakens, the hose balloons, and eventually it lets go — usually at 2 a.m. or while you’re at work for nine hours. A half-inch line at household pressure moves several gallons a minute. Nine hours of that is a destroyed floor, a destroyed ceiling below, and a remediation crew.
Water damage is consistently one of the largest homeowners claim categories in the country, and supply-line failures are a meaningful slice of it. Insurers have gotten specific enough about it that some policies now carry separate deductibles for water loss.
Now look at the shutoff valves. If they’re the round multi-turn type with a rubber washer inside, they’re probably seized. The washer has fused to the seat. Try to close one in an emergency and you’ll either strip the stem or snap it.
Quarter-turn ball valves fix that — handle parallel is open, perpendicular is closed, and they don’t seize because there’s no compressible washer to harden. Both valves and both braided stainless lines come to $30 to $60 total.
Shut off the main, open a low faucet to drain the pressure, and work with a bucket and towels staged. If the old valve is a compression fitting, a SharkBite-style push-on replacement skips soldering entirely.
Then drop a $20 battery leak sensor on the cabinet floor. It’ll scream at 3 a.m. instead of letting the water run until morning.
16. Repaint the Walls and Ceiling in Scrubbable Satin

Kitchen walls carry a fine, invisible film of cooking grease. Flat paint absorbs it and holds it forever — which is why the wall above the stove never looks clean no matter what you spray on it.
Satin or semi-gloss wipes down. It also bounces your new under-cabinet lighting around the room instead of swallowing it.
Degrease before you prime or nothing sticks. Sixty to a hundred twenty bucks for walls and ceiling both.
17. Seal the Pipe Holes Under the Sink

Get a flashlight and look at where the drain and supply lines punch through the back or floor of your sink cabinet. Those holes were cut oversized on purpose, so the plumber had wiggle room.
They’re also the single busiest pest highway in the house.
German cockroaches travel the wall cavities and plumbing chases between units and rooms, and they emerge exactly there — warm, dark, damp, and three feet from a food source. A mouse needs a gap the width of a pencil. A young rat needs about the size of a quarter. Those pipe holes are usually bigger than both.
Fix it in two layers. First, pack the gap tight with copper mesh — not steel wool, which rusts into orange dust within a year and reopens the hole. Copper doesn’t corrode, and rodents won’t chew through it because the strands catch in their teeth. Stuff it in firmly with a screwdriver until it’s dense.
Then cap it with expanding foam or a bead of silicone. The foam alone is useless on its own — mice chew straight through cured foam like it’s bread — but over packed copper it seals the air gap and locks the mesh in place.
While you’re down there, check the floor of the cabinet for the dark water staining and the pepper-fleck droppings that mean you’ve already got traffic. Ten dollars of material closes a door that’s been open since the house was built.
18. Take Two Upper Doors Off and Paint the Insides

Free, if you own a screwdriver.
Pull a pair of upper doors — ideally flanking a window or the sink — and you’ve made open shelving with zero materials. HGTV puts this near the top of its budget update list, and designers lean on it because open shelves make a small kitchen read larger.
Paint the interior a contrast color — deep green, navy, warm clay — so it looks deliberate instead of like you lost the doors. Then style it with things you actually use daily, not decorative objects that collect grease.
Keep the doors and hinges in the basement. Reversible in ten minutes.
19. Put the Main Kitchen Light on a Dimmer

A kitchen at 100% brightness at 10 p.m. feels like a job site. Drop it to 20% and the same room feels like a place you want to sit.
A dimmer or smart switch runs $25 to $45. Confirm your LED fixture is dimmable first — most are now, but the label matters.
This is the fix that makes a $60 flush mount read like a $300 one.
20. Drop In a New Stainless Sink

A scratched, stained, or chipped sink drags down every surface around it. New faucet over an old basin looks worse, not better.
A 22-gauge drop-in that reuses the existing countertop cutout is $120 to $190 and a same-day swap. Measure the cutout, not the old sink’s outer rim.
Skip the undermount version. Replacing an undermount means pulling or re-cutting the counter, and that’s the move that blows a $200 budget into a $2,000 one.
21. Reskin the Toe Kick

That four-inch strip under your cabinets takes every mop head, every boot toe, every vacuum impact for twenty years. It’s usually the most beat-up surface in the room and nobody ever looks at it directly.
Cut peel-and-stick vinyl plank to width and apply it right over the old kick. Twenty-five to fifty dollars, about an hour.
Clean and degrease first. The cabinets above suddenly look newer and you won’t be able to explain it.
22. Degrease the Range Hood Filter and Check Where It Actually Vents
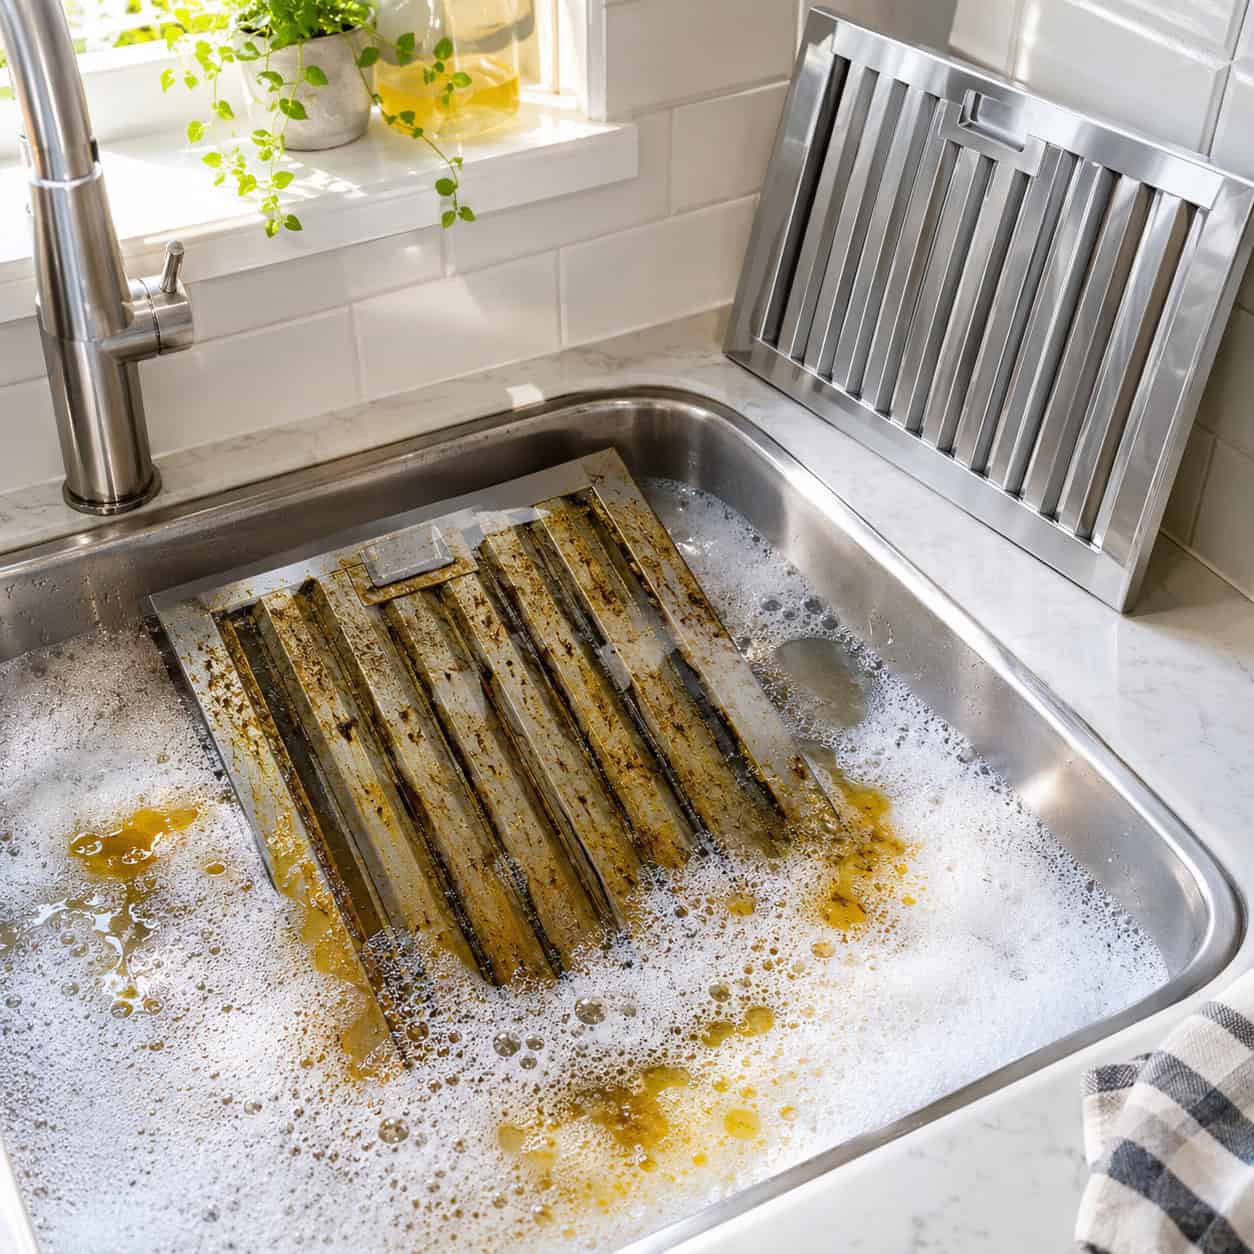
Pull the metal mesh or baffle filter out of your range hood right now. If it’s amber, sticky, or you can’t see light through it, you’ve got a problem on two fronts.
A saturated filter stops pulling air, which is why the kitchen still smells like last Tuesday’s salmon. More seriously, it becomes fuel. Grease-laden surfaces above a cooktop are a documented factor in how a small stovetop flare-up turns into a kitchen fire — cooking is the leading cause of home structure fires in the U.S. by a wide margin, and grease ignites around 600°F.
Degreasing is easy and oddly satisfying. Fill the sink with the hottest water you can get, add a half cup of baking soda and a squirt of dish soap, and let the filter soak 15 minutes. The grease releases in sheets. Scrub lightly, rinse, dry completely before reinstalling. Replacement filters are $15 to $40 if yours is too far gone.
Now the part people skip. While your head is up there, figure out where that hood actually vents. Look for ductwork going up through the cabinet above or out through the exterior wall behind it.
- Duct to the outside — good, confirm the exterior damper flap actually opens
- No duct at all — it’s recirculating through a charcoal filter
- Charcoal filter present but black and matted — it’s been doing nothing for years
A recirculating hood doesn’t remove moisture, smoke, or combustion byproducts from a gas range. It just strains some of the odor out, and only if the charcoal is fresh. Those cost about $25 and want replacing every six months in a kitchen that actually cooks.
23. Butcher Block on the Short Counter Run

You can’t afford to replace all the countertops. You can afford one four-foot run.
A small slab of birch or acacia butcher block runs $100 to $200 and installs with a circular saw, a jigsaw for the sink or stove cutout if needed, and a few screws up through the cabinet rails.
Put it on the shortest run — a coffee station, a small peninsula, the stretch beside the range. The warm wood becomes the focal point and the laminate everywhere else stops being the thing your eye lands on.
Oil it on day one and every few months after. Mineral oil, cheap, takes five minutes.
24. Rebuild the Drawers With Full-Extension Soft-Close Slides

Old epoxy-coated side slides open about two-thirds of the way. Load the drawer with silverware or cast iron and they bind, tilt, and drag.
Ball-bearing full-extension soft-close slides are $12 to $20 a pair. Measure the existing slide length — 18 or 20 inches covers most — and buy the same.
This is the upgrade people feel every single day and can never name. The whole back of the drawer is suddenly reachable.
25. Install an Under-Sink Water Filter With Its Own Faucet

Pitcher filters are a chore you repeat four times a day. Pros plumb a cartridge inline and run a small dedicated spout through an existing sprayer hole in the counter.
Ninety to a hundred sixty dollars if you do it yourself, and it clears both the countertop and a shelf in the fridge.
Be honest about the running cost: replacement cartridges run $30 to $60 a year depending on the system. Still cheaper than bottled water by a wide margin.
26. Reseal the Stone Countertop (and the Truth About Refinishing Kits)
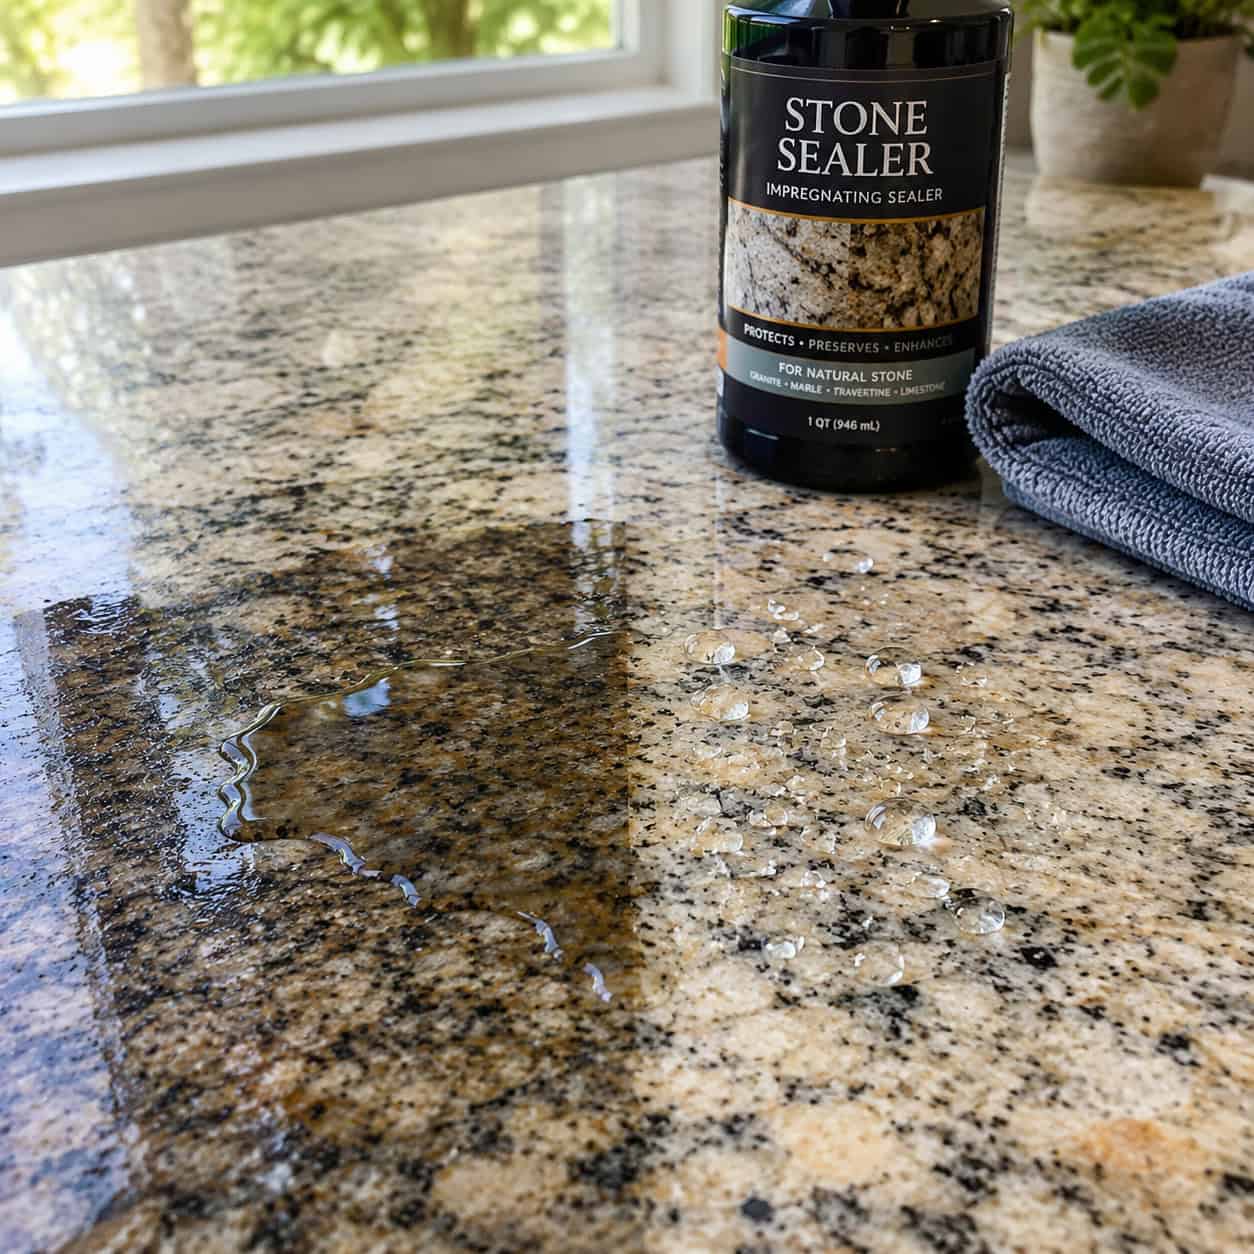
Splash a tablespoon of water on your granite and wait five minutes. If the stone darkens where the water sits, the sealer is gone and the counter is drinking in every drop of olive oil that hits it.
A $25 bottle of impregnating sealer and a clean rag fixes it in half an hour. Wipe on, let it dwell, buff off the excess before it hazes.
As for paint-on countertop refinishing kits: they photograph beautifully and last about two years. Hot pans mark the topcoat, knives cut through it, and the edges chip first. Fine if you’re selling in eighteen months. A disappointment if you’re staying.
27. Close the Gap Above the Cabinets With Molding

That dusty canyon between cabinet tops and the ceiling — usually 8 to 14 inches — announces builder-grade from across the room. Nothing stored up there is ever used, and everything up there is greasy.
Three ways to kill it. Crown molding straight onto the cabinet tops. A stacked filler board painted to match. Or a simple painted box built to the ceiling.
Sixty to a hundred fifty dollars in stock. Stock cabinets suddenly look built-in, which is the entire point of the exercise.
28. Add Shoe Molding Where the Floor Meets the Toe Kick

Every floating floor needs an expansion gap at the perimeter. Cheap installs leave that gap wide open, and it fills with crumbs, pet hair, and dropped lentils forever.
Quarter-round or shoe molding, painted to match the toe kick, closes it. Twenty-five to forty dollars for the whole kitchen perimeter.
Nail into the toe kick, never into the floor — the floor has to be free to move. This single detail is what separates a pro install from a weekend one.
29. Vacuum the Fridge Coils and Test the Door Gasket

Appliance techs do this twice a year in their own homes. A dust-blanketed condenser makes the compressor run longer and hotter, and compressor failure is what kills refrigerators before their time.
Pull the kick plate at the bottom front or the panel at the back, and go after the coils with a $10 coil brush and a shop vac. Unplug it first.
Then the dollar-bill test: close the door on a bill and pull. If it slides out with no resistance, the gasket has lost its seal and your fridge is cooling the kitchen. Thirty seconds, no cost, catches a slow expensive leak.
30. Spend 20 Minutes Making Every Door Hang Square

Free. Costs nothing but a screwdriver and twenty minutes.
Euro hinges have three adjustment screws: up and down, in and out, side to side. Almost nobody touches them after the day the cabinets went in, and twenty years of settling and slamming has pushed every door a little out of true.
Open two adjacent doors and look at the gap between them. Close them and sight down the row. Crooked gaps are what your eye reads as “old kitchen” even when it can’t articulate why.
Start at one end and work across. Turn the screws a quarter turn at a time.
When every door and drawer front lines up, the room reads as cared for. That’s the whole thing — and it’s the one fix on this list that costs absolutely nothing.
31. Stainless Appliance Film Over a White Dishwasher

Honest verdict ahead, because this one cuts both ways.
Adhesive stainless film is $30 to $60 per appliance and it photographs like a brand-new unit. If you’re listing the house in six weeks, it’s a legitimate move.
But it bubbles. Around the handle first, then anywhere near heat — dishwasher vents, oven edges. Give it a year and the seams lift.
Short-term win. Not a permanent one.
32. Peel-and-Stick Vinyl Plank Over the Old Kitchen Floor

This one stretches the budget and the list should say so.
At $1 to $3 per square foot, a 120-square-foot kitchen runs $120 to $360. Stay at the lower tier and you clear $200; go for anything with real wear layer thickness and you don’t.
It goes over existing vinyl or tile if the surface is flat, clean, and fully adhered. Over a floating floor or a loose tile, it telegraphs every flaw underneath within months.
33. Replace the Dated Valance With a Woven Roman Shade

The scalloped fabric valance over the sink window is doing more aging work than anything else in the room.
Pull it. A woven wood or bamboo Roman shade runs $40 to $90 per window and brings in texture that a painted kitchen badly needs.
This drifts from contractor fix into decorating, which is fine. The light coming through a woven shade over the sink is the nicest thing that happens in most kitchens all day. If you’re chasing that same effect elsewhere in the house, the same logic applies to houseplants that make a home look expensive — texture and intent beat money almost every time.
Add up the ones that apply to your kitchen and you’ll land somewhere around $1,200 for a room that looks and functions like it cost thirty times that.
But the fixes that matter most aren’t the ones guests notice. They’re the silicone bead at the sink rim, the braided line under the cabinet, the copper mesh around the drain pipe.
Those are the ones contractors do first in their own homes, and they do them before anything breaks.
Start with the caulk. Finish with the hinges. Everything in between is a Saturday.