

Showroom lighting is engineered to sell. Four thousand lumens of warm LED raking across a honed stone top, a glass bowl lit from behind, every door panel hung dead level by a crew that does nothing else all day.
Your bathroom has one humid exhaust fan and a window.
Vanities fail in predictable ways, and almost none of those ways are visible on the sales floor. They show up in year two, year four — a spongy cabinet bottom, a drawer that drags, an etched ring where a bottle of toner sat overnight.
The good news: every single failure mode here is something you can spot in ten seconds if you know where to look. Open the doors. Pull the drawer all the way out. Flip the spec sheet over.
Here are 31 bathroom vanity features worth walking past, no matter how good they look under the display lights.
1. A Particleboard Cabinet Box Hiding Behind a Pretty Door

The door sells the vanity. The box is what fails.
Most vanities under about $600 use particleboard — wood chips and resin pressed into a panel, then wrapped in a thin printed laminate. The visible surfaces look fine. The raw, unsealed edges at the plumbing cutout and along the cabinet floor do not.
Particleboard doesn’t shed water. It drinks it. Moisture wicks into the voids between chips, the panel swells, and the resin bond lets go. Once that happens the material never recovers — it stays soft, like damp cardboard that dried crooked.
Here’s the part worth your attention: a swollen cabinet bottom is rarely caused by splashing. It’s caused by a slow leak you haven’t found yet. A weeping supply stop. A loose slip nut on the trap. A hairline crack in a plastic P-trap elbow.
Go check right now. Open the vanity under your main bathroom sink, clear it out, and put a dry paper towel flat on the cabinet floor directly under the trap. Press it down with your fingers.
- A soft or spongy spot anywhere on the deck
- Dark staining radiating out from the drain pipe
- White chalky crust on a shutoff valve or compression nut
- A musty smell that hits you when the door opens
- Laminate bubbling or lifting at the cutout edge
Any one of those means water has been there for months. Angi puts cabinet-floor liners and regular under-sink checks at the top of the prevention list for exactly this reason — the damage is almost always discovered late.
What to buy instead: plywood construction, or at minimum a marine-grade/moisture-resistant MDF core with every edge sealed. Plywood’s cross-laminated layers resist the swelling that destroys particleboard, and the price gap between a particleboard and a plywood vanity of the same width is usually $200 to $400 — far less than a cabinet replacement plus a leak that’s been running quietly for a year.
2. The Vessel Sink Perched on Top of the Counter

No fixture from the last twenty years gets regretted faster.
The seam where the bowl’s foot meets the stone is a caulk line that lives in soap scum. Toothpaste runs into it. It discolors. You cannot scrub it clean, only re-caulk it.
Then there’s splash. A raised rim throws water outward instead of containing it, so the counter around the bowl stays wet and the base of your faucet develops a mineral ring.
And the height is wrong for anyone short. A bowl sitting 5 to 6 inches above the deck puts the rim near 40 inches — a kid needs a stool to reach it.
3. A Polished Carrara Marble Vanity Top

Marble is calcium carbonate. Acid dissolves it on contact.
Toothpaste, mouthwash, acne cleanser, nail polish remover, a splash of lemon oil off your hands — every one of those leaves a dull etch mark where the polish literally dissolved off the surface.
Sealing doesn’t stop it. Sealer blocks staining, which is liquid soaking in. Etching is a chemical burn on the stone itself, and no sealer prevents it.
A bathroom is the single worst room in a house for polished marble. If you want the look, go honed — it hides etch damage because there’s no shine to lose.
4. Fake Drawer Fronts Flanking the P-Trap

Count the drawer fronts on the display model. Now pull each one.
On most stock 36- to 48-inch vanities, the two fronts beside the sink are screwed-on panels with nothing behind them. You bought the look of six drawers and got two.
The fix exists and costs the manufacturer almost nothing: U-shaped drawer boxes that wrap around the P-trap. Designers increasingly refuse to spec anything else, and it’s the single biggest storage upgrade available in a vanity.
Ask the salesperson which fronts are functional. If they hesitate, you have your answer.
5. High-Gloss Thermofoil or Lacquer Fronts

Thermofoil is a vinyl skin heat-pressed onto fiberboard. In a room that gets steamed twice a day, that bond is on a clock.
It lifts at the corners first. Then a whole edge peels back, exposing the brown fiberboard underneath.
There is no repair. You can’t re-glue it, can’t sand it, can’t paint over it. The door gets replaced or the vanity looks wrecked.
Gloss also records fingerprints like evidence, and vanity lighting hits it at exactly the wrong angle.
6. A Floating Vanity With No In-Wall Blocking

Floating vanities aren’t the problem. Floating vanities anchored into drywall and whichever two studs happened to land there — that’s the problem.
Do the math on the load. A 48-inch cabinet runs 60 to 90 pounds empty. A quartz top with an undermount bowl adds 70 to 110. Fill the sink and that’s another 15. Now lean a teenager on the front edge while they brush their teeth, and you’ve got a cantilevered load pulling down and out at the same time.
Drywall anchors do not hold that. Two stud screws at random spacing barely do.
The correct detail is horizontal blocking: a 2×8 or 2×10 let into the studs across the full width of the vanity, flush with the stud faces, positioned at the manufacturer’s specified mounting height. The cabinet’s French cleat or mounting rail then screws into solid lumber everywhere, not just at two points.
This has to happen before the drywall and tile go up. After tile, you’re cutting into a finished wall — and on a floating vanity you usually want the drain roughed into the wall rather than the floor anyway, because a floor drain under a floating cabinet defeats the whole look.
Signs a wall-hung vanity is losing its grip:
- A hairline crack in the drywall at the top corners of the cabinet
- The front edge sitting visibly lower than the back
- Doors or drawers that suddenly stop closing square
- Any movement at all when you press down on the front corner
Catch it early and you’re re-anchoring. Catch it late and you’re patching a wall, replacing a cracked top, and redoing all the supply connections that got yanked when it sagged.
7. Open Towel Cubbies Under the Sink

Rolled white towels in an open cubby photograph beautifully. They last about a week in real life.
Cotton is hygroscopic — it pulls humidity straight out of a bathroom that spikes to 90% relative humidity every shower. Towels in an open niche never fully dry.
They also catch dust, lint, and whatever becomes airborne when a toilet flushes six feet away.
Within a month the cubby holds a hair dryer, a basket of hair ties, and two towels nobody will use. Closed storage, every time.
8. A One-Piece Cultured Marble Top With the Bowl Molded In

Cultured marble is crushed stone dust in resin, sprayed with a thin gel coat. It’s been the cheapest way to finish a vanity since the early 1980s.
That gel coat is the whole product. It yellows under UV and cleaning chemicals, and it’s soft enough that a gritty sponge leaves permanent dull tracks.
Worse, the bowl and deck are a single casting. Crack the sink and you replace the entire top — there’s no swapping just the basin.
Quartz and sintered porcelain tops with an undermount bowl cost more upfront and don’t do any of this.
9. A Deck Pre-Drilled for 4-Inch Centerset Only

Three holes, four inches apart center to center. It’s the default on nearly every stock vanity top under $400, and it quietly decides what faucets you’re allowed to own.
A 4-inch centerset deck locks out widespread faucets, which need 8 inches of spread, and it locks out single-hole designer faucets unless you add a deck plate to cover the extras.
Redrilling stone is possible and expensive. On cultured marble, it often cracks.
Check hole count and spread before you look at a single finish. It’s the most consequential number on the spec sheet and the one nobody reads.
10. A Clear Glass Vessel Bowl
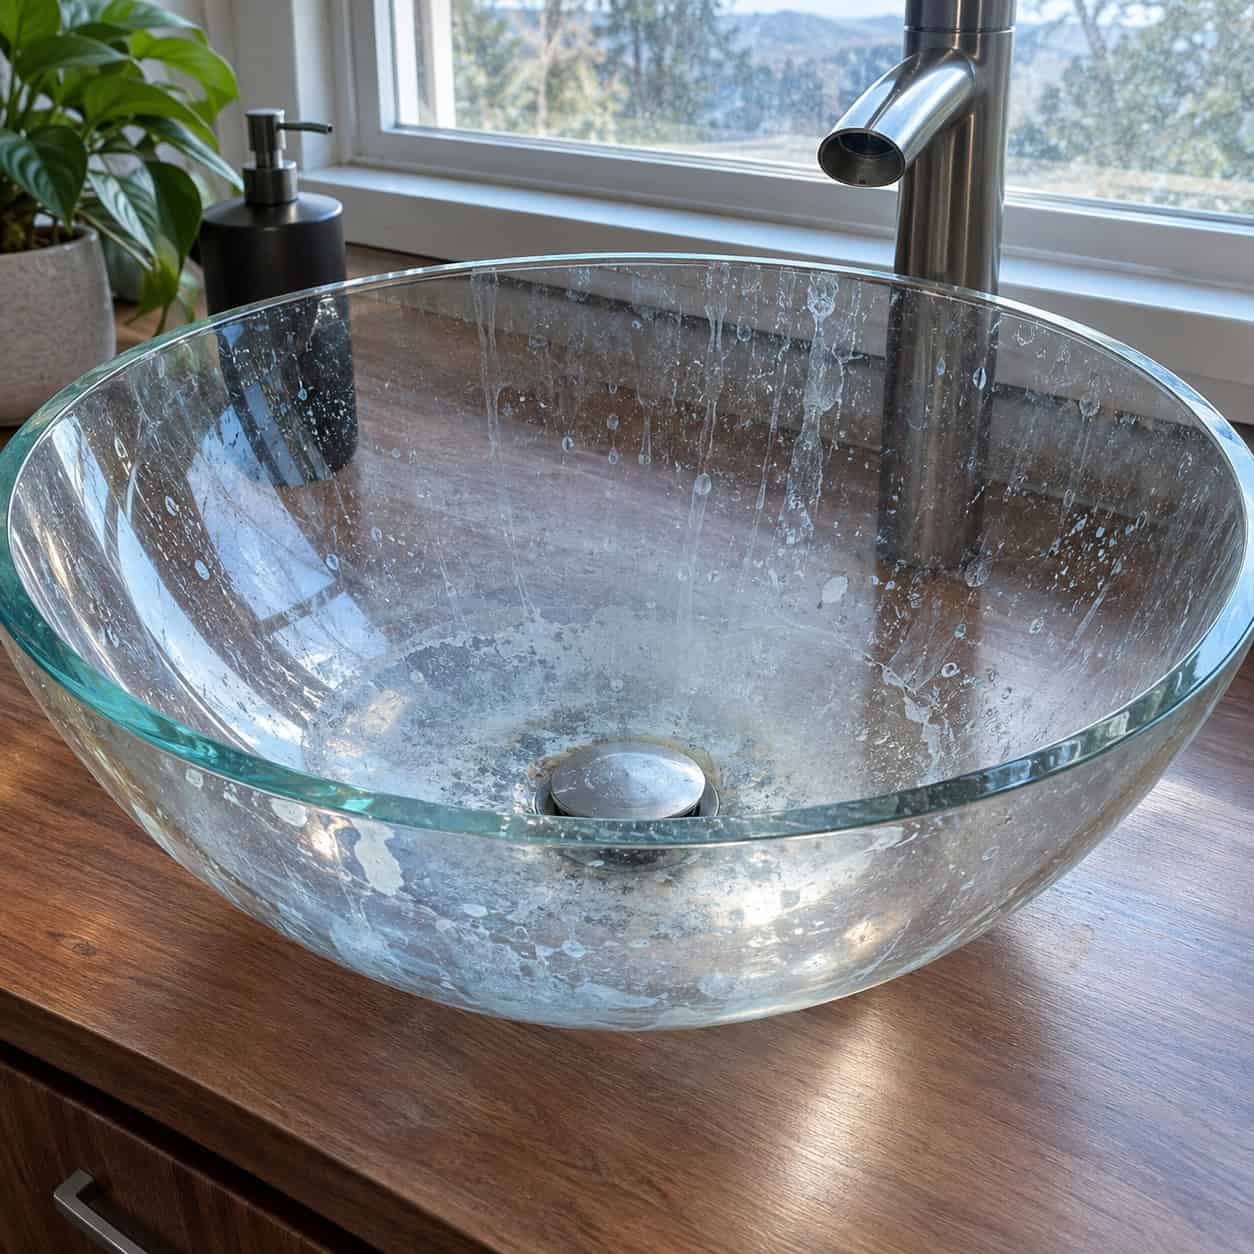
Take every vessel problem and add transparency.
Glass shows water spots, fingerprints, soap film and toothpaste residue from both sides at once. Hard water etches the surface permanently over a few years, leaving a cloudy haze no cleaner touches.
It also breaks. A dropped shampoo bottle or a perfume jar off the shelf above can crack the rim.
Lit from above on a showroom plinth it reads like jewelry. Lit by a north-facing window at 7 a.m., it reads like it needs cleaning. Because it does.
11. The 30-Inch Builder-Height Cabinet

Thirty inches was the standard because mid-century builders sized bathroom vanities around children.
Adults bend. Every day, twice a day, for as long as you own the house.
Comfort height is 34 to 36 inches and matches kitchen counters. It costs nothing extra on a new vanity.
The only real reason to go low is a vessel bowl — and that’s the trap. Showrooms pair 30-inch cabinets with vessels until the combination looks normal, selling you two bad decisions as one design choice.
12. A Tiled Vanity Top With Grout Lines

Tiled vanity decks were everywhere from 1975 to 1995, and they’re creeping back as a retro move.
Grout is porous cement. At a sink deck it absorbs toothpaste, foundation, hair dye, and mineral deposits from every splash.
Bright white grout is a day-one feature. By month eight it’s gray at the front edge and blotchy around the faucet.
Annual sealing fixes most of it. Nobody does it annually.
13. A Sliding Barn-Door Vanity Front

A sliding door can only ever uncover half the cabinet. Reaching anything behind the closed half means sliding the door the other way first.
The bottom track fills with hair, dust and dropped toothpaste, and it’s narrow enough that a vacuum won’t get it.
Rollers loosen. The door starts to drag and eventually jumps the track.
It’s also the most date-stamped thing on the showroom floor — a 2018 timestamp bolted to your bathroom.
14. A Butcher-Block or Live-Edge Wood Top

Wood around a sink isn’t a material choice. It’s a maintenance contract.
Water pools at the faucet base and sits in the bowl cutout. The finish lifts at those two spots first, water gets into the end grain, and the wood goes black.
Black is tannin and mold reacting in the fibers. It doesn’t sand out of an installed top without taking the profile with it.
Marine-grade varnish helps and still needs recoating every couple of years around the wet zones. Skip two cycles and you’re done.
15. Two Sinks Crammed Into a 60-Inch Vanity

Double sinks sell on resale talk. Sixty inches doesn’t have the width for it.
Split 60 inches two ways and each person gets about 12 usable inches of counter after the bowls and faucets take their space. That’s room for a toothbrush holder.
You also lose the center drawer stack — the best storage in the whole cabinet — to a second P-trap and a second set of supply lines.
Under 72 inches, one large bowl with real counter and a full bank of drawers beats two cramped sinks every time. If you’re committed to doubles, roughing in two drains properly matters more than squeezing them in.
16. A Wall-Mounted Faucet Rough-In

Wall-mounted lavatory faucets are the cleanest look in the room and the least forgiving decision on this list.
The valve body lives inside the wall cavity. Everything you’ll ever need to service — cartridges, seats, the mixing valve itself — sits behind finished tile.
Spout projection has to be solved before the rough-in. The spout needs to reach past the bowl rim and land its stream in the drain zone, which depends on the bowl you chose, its exact position, and the mounting height. Get it wrong by an inch and water hits the back wall of the basin and sprays onto the counter and your shirt.
Shallow basins make this worse. A wall faucet with a long drop into a 4-inch-deep bowl throws water everywhere.
If you’re doing it anyway, insist on two things. First, a valve with a serviceable cartridge accessible from the front through the escutcheon — not one requiring rear access. Second, an access panel from the adjacent room or closet if any part of the assembly can’t be reached from the bathroom side.
A concealed in-wall leak is one of the most expensive water damage scenarios in a house, because nothing shows until the drywall below stains or the ceiling under the bathroom bubbles. By then the stud bay has been wet for weeks.
Also check the valve is rated for the wall depth. A standard 2×4 wall with tile backer and tile leaves tight clearance, and some European valve bodies assume a thicker assembly.
17. Stapled Drawer Boxes on Roller Glides

Pull a drawer fully out in the showroom. Flip it over if you can.
Flat-pack vanities almost universally use stapled butt joints — the sides shot into the front with crown staples — and a thin hardboard bottom tacked into a shallow groove.
Load that with hair tools and bottles, and the bottom bows while the joints work loose. Two years, maybe three.
Single plastic roller glides make it worse. They only extend about three-quarters, so the back of the drawer is a mystery zone, and they sag as the plastic wears.
The benchmark is a dovetailed solid-wood box on full-extension undermount glides with soft close. It’s the clearest single indicator of whether a vanity was built to last.
18. A Poured Concrete Vanity Top

Concrete reads as custom and handmade. It is also porous, heavy, and chemically alive for a long time after it’s installed.
Anything pigmented stains it — hair dye, self-tanner, red wine on New Year’s. Hairline crazing appears as the slab finishes curing, and on a vanity top those lines catch grime.
It needs resealing on a schedule, usually every 12 to 18 months with a penetrating sealer plus wax. Most homeowners quit by year two.
And a 48-inch concrete top can run 180 pounds. On a wall-hung cabinet that’s a structural conversation, not a finish choice.
19. A Top Installed With No Backsplash At All

The minimalist detail: counter runs straight to the wall, nothing but a bead of caulk, clean horizontal line.
It works when the wall is dead flat, the caulk is perfect, and someone maintains it. Three conditions, and drywall is never dead flat.
What happens instead: water from hand-washing runs along the back edge, finds the low spot where the counter doesn’t quite meet the wall, and goes down behind the cabinet.
That’s the worst possible path. It wets the back panel and cabinet deck from behind, where you can’t see it, and it soaks into the drywall paper at the base of the wall.
The first visible symptom is usually paint. It bubbles or peels in a band right behind the sink, six to eighteen months before the cabinet itself shows anything.
Then the back edge of the cabinet deck softens. Then, if there’s vinyl or laminate flooring, the seam at the toe kick starts lifting.
Prevention is a $9 tube of 100% silicone and twenty minutes. Clean the joint completely, mask both sides, run a continuous bead with no skips, tool it, pull the tape while it’s wet. Redo it the moment it cracks or discolors — a failed caulk line is worse than none because it holds water against the seam.
Better still: spec a 3- to 4-inch backsplash in the same material. It’s the cheapest insurance on this entire list.
20. A Shallow 16- to 18-Inch Deep Cabinet

Shallow vanities exist for powder rooms and tight baths, and they’re sold far outside that use.
The depth forces a shallow bowl set close to the front edge. The faucet stream hits the front slope of the basin and bounces straight back at you.
You end up with a wet shirt and a wet floor at the toe kick, every single day.
The drawers won’t hold anything wider than a folded hand towel. Twenty-one to 22 inches deep is where a vanity starts actually working — that’s standard depth for a reason.
21. Handleless Push-to-Open Drawers

Push latches want a clean, perpendicular press near the latch point. Bathrooms don’t provide that.
Wet hands slide. Kids shove the corner. Your hip catches a front on the way past the sink and the drawer pops open.
Every front becomes a fingerprint map, right where you push, and there’s no handle to take the abuse instead.
Latches also drift out of alignment as the cabinet settles, and then drawers either won’t catch or won’t release.
22. Mirrored Glass Drawer Fronts

Deco revival, Hollywood glam, whatever the showroom calls it — mirrored fronts are glass panels glued to a substrate.
Corners chip. The edges are the exposed part, and a vacuum handle or a dropped bottle takes a piece out.
Moisture creeping behind the glass attacks the silvering, and you get black spots spreading inward from the perimeter. That’s irreversible.
And at waist height in a bathroom, mirrors collect every splash of water, toothpaste fleck and hand smudge. Stunning under spotlights. Grim at 7 a.m.
23. A Console Vanity on Open Metal Legs

You’re trading the only storage in the room for a clear view of your plumbing.
That plumbing now has to be presentable, which means swapping the builder’s plastic trap and chrome-plated stops for decorative polished brass or nickel — figure $150 to $350 in parts you otherwise never see.
The floor under an open console collects hair and dust in a way an enclosed cabinet never does, and it needs wiping constantly because it’s always in view.
Consoles make sense in a powder room with a linen closet nearby. In a primary bath with no other storage, you’ll regret it by month three.
24. A Built-In Makeup Knee-Space Section

The dropped makeup desk was a 1990s master-bath signature and it’s the first thing remodelers tear out.
It consumes 30 to 36 inches of your best wall — prime storage width — and gives back a knee hole.
The height is the real problem. It sits lower than the vanity but higher than a proper desk, so it’s uncomfortable to sit at and awkward to stand at.
Nearly everyone who gets one uses it twice, then it becomes where the hair dryer lives.
25. A Shared Trough Sink

One long basin, one drain, two people using it at the same time. Think about what that means.
Whatever one person spits or rinses travels along the basin floor past the other person’s station on the way to the drain.
Water also pools at the far ends, because a trough needs a precisely sloped bottom to drain fully and most don’t have one. Standing water means mineral rings and pink bacterial film at both ends.
Faucet placement has to be engineered too, or two streams hitting a flat trough bottom throw crossfire splash at both users.
26. A Sink Bowl With No Overflow Hole

The overflow is a small opening near the rim connected by a channel to the drain body. It does one job: it keeps a running faucet from putting water on your floor.
Here’s the scenario it’s built for. A washcloth slides across the drain and seals it while the faucet is running, and you walk out of the room. With an overflow, the sink fills to the overflow line and stops. Without one, water runs over the rim onto the counter, down the cabinet face, and onto the floor.
From there it goes under the toe kick, into the subfloor, and on a second story, into the ceiling below. That’s a drywall-and-insulation job at minimum.
Vessel, stone and many designer basins ship with no overflow. That’s a style decision made by the manufacturer, and it changes the hardware you must buy.
A non-overflow sink requires a non-overflow pop-up or grid drain — one with no side slots in the drain body. Put a standard overflow drain in a non-overflow sink and water escapes through those slots instead of sealing, so the sink won’t hold water.
The reverse mistake is just as bad: a sealed non-overflow drain in a sink that has an overflow channel traps water in the channel, where it sits and turns sour.
So before you order the drain assembly, confirm two things: whether the bowl has an overflow, and whether the drain you picked matches. The listings say it in the fine print, and people miss it constantly.
27. A Waterfall-Edge Stone Top

Mitering stone down the side of a vanity roughly doubles the slab and fabrication cost, because you’re buying material for a vertical panel plus paying for a precision 45-degree miter and seam.
On a kitchen island it’s a feature. On a 48-inch vanity it’s a panel at shin height that gets kicked, bumped by the vacuum, and chipped at the floor corner where the miter is thinnest.
Quartz chips at a mitered edge are repairable but visible.
It also reads as a 2018-to-2024 trend stamp — the kind of detail that will date a bathroom faster than the finish on the faucet.
28. An Antique Dresser Converted Into a Vanity

The most charming idea in the room. Also the most doomed.
A century-old dresser is veneer over solid secondary wood, assembled with hide glue. Hide glue is reversible with heat and moisture — that’s a feature for furniture restorers and a catastrophe in a bathroom.
Daily steam softens those joints. The veneer bubbles and lifts along the top and the drawer fronts.
Then there’s the surgery. To fit a trap you cut the back out of the top drawer box, notch the dust frames, and usually lose the drawer entirely. Depth is typically 18 to 19 inches, which puts you in the shallow-cabinet problem from entry 20.
You’ve destroyed a real piece of furniture to create a one-off that leaks. If you love the look, buy a new vanity built to mimic it — plenty of manufacturers do it well now.
29. An All-In-One Vanity-and-LED-Mirror Set

This one’s a genuine judgment call rather than a flat no.
The integrated LED strip, anti-fog pad and touch sensor are proprietary. When the driver board fails — and low-voltage drivers are the weak link in every lit mirror — there’s no replacement part from a hardware store.
Some brands stock spares for a few years. Many online-only brands don’t exist by year five.
That said, plenty of people love them, and the failure evidence here is thinner than for anything else on this list. If you buy one, buy from a brand with a parts catalog and a real warranty — and keep the model number somewhere you’ll find it.
30. A Travertine or Onyx Stone Basin

Travertine is naturally voided limestone — it’s full of pits that get filled at the factory with resin or cement. Those fills pop out over time, leaving small craters that hold soap and grime.
Onyx is translucent and gorgeous and even softer than marble. Both are acid-sensitive, both stain, both need regular sealing.
A basin is the single wettest, most chemically abused surface in a bathroom. It’s the last place to put a porous stone.
Vitreous china and fireclay cost less and resist everything these don’t.
31. Unlacquered Brass Faucet and Pulls

This one’s divisive, and the people who love it have a point.
Unlacquered brass is raw metal with no protective clear coat, so it oxidizes. Fingerprints darken into the finish. Water lines etch themselves around the base. Over a few years it goes from bright gold to a mottled brown-bronze.
That’s the entire appeal for some buyers — a living patina that records use.
It’s also irreversible without polishing the whole piece back down, which restarts the clock. And it’s rarely a consistent patina: high-touch spots stay bright while the rest darkens, so the handle looks different from the spout.
Know which camp you’re in before you spend $400 on a faucet. If you’d be tempted to polish it, buy a lacquered or PVD finish instead and skip the argument with yourself.
The pattern across all 31 is the same. Showrooms sell surfaces, and bathrooms destroy things from the inside.
So inspect what the display is hiding. Open every door, pull every drawer to its stop, feel the raw edge at the plumbing cutout, count the faucet holes, and ask what’s behind the fronts that don’t open.
Five minutes of that saves you the four years it takes to find out the expensive way.