
Watch a plumber in his own kitchen sometime. He scrapes the plate into the trash before the sink. He never reaches for the blue bottle under the counter.
There’s a gap between what homeowners do and what the person who fixes the damage does. It isn’t about skill. It’s about having seen the same five failures a thousand times and deciding, quietly, never to repeat them at home.
Some of these will sting a little. The flushable wipes. The drain cleaner. The toilet tank tablet you’ve been dropping in for years.
Here are 36 things plumbers avoid in their own houses — and the specific reason behind each one.
1. Pour a Bottle of Chemical Drain Cleaner Down a Slow Drain

This is the one pros name first, every time.
Those cleaners are caustic. They react with whatever’s in the pipe and generate real heat — enough to soften PVC and warp an older trap. What they don’t do is remove the clog.
A slow bathroom drain is almost always hair bound up in soap scum, coating the inside of the pipe like plaque. The chemical burns a narrow channel through the middle, water runs for a week, and the biofilm is still there, now with a layer of caustic sludge sitting on top of it.
Then you call a plumber, who has to open a trap full of lye.
Pros use a hand snake, a barbed hair-grabber strip, or a bacterial enzyme product that actually digests the organic film over a few nights.
2. Flush a “Flushable” Wipe

The word on the package means it fits down the hole. Nothing more.
Toilet paper is engineered to fall apart in seconds of agitation. Wipes are built from bonded fibers designed to survive being wet and scrubbed — which is the entire point of a wipe.
So they travel a few feet, catch on a joint or a root intrusion, and start collecting. Add grease and you get the thing municipalities now budget for: a fatberg. Roto-Rooter has run flushability tests that leave wipes fully intact after the point toilet paper has dissolved.
Plumbers keep a small lidded can beside the toilet. That’s the whole solution.
3. Buy a Bargain-Bin Faucet With Plastic Internals

Watch a plumber in the faucet aisle. The whole evaluation takes about ten seconds.
He picks it up first. Weight means brass instead of zinc alloy. Then he reads the box for “ceramic disc cartridge” and checks whether the mounting shank and nuts are metal or molded plastic.
Last question: does the brand mail you replacement cartridges free, forever? Moen and Delta do. The $49 import does not, because in four years the part number won’t exist.
A cheap faucet isn’t cheap — it’s a service call with a spout attached. Much of the difference between a cheap and expensive faucet is hidden in parts you never see.
4. Chase Bacon Grease Down the Drain With Hot Water

Hot water and a squirt of dish soap doesn’t dissolve fat. It just relocates it.
The grease stays liquid for maybe twenty feet of pipe. Then the water cools, the fat comes out of suspension, and it plates onto the pipe wall where it starts catching coffee grounds and rice and whatever else comes through.
It’s the same for butter, salad dressing, bacon fat, and the oil you fried in. A can under the sink, a lid, and out with the trash.
There’s a longer list of things you should never put down your kitchen sink drain, and grease tops all of them.
5. Drop a Blue Cleaning Tablet in the Toilet Tank

The water turns a pleasing blue. Something else is happening underneath.
That tablet is slowly dissolving chlorine or bleach into standing water that sits against your flapper, your fill valve seals, and your tank-to-bowl gasket twenty-four hours a day. Rubber doesn’t survive that. Within a year the flapper is gummy and warped and the toilet starts running at 3 a.m.
Check the warranty language from Kohler or American Standard. Damage from in-tank cleaners is explicitly excluded.
Skip it. Clean the bowl with a brush like everyone’s grandmother did.
6. Tap the Ice Maker Line With a Saddle Valve

A saddle valve is a clamp that drives a tiny needle through the side of a copper water line. No soldering, no shutoff, five minutes.
It’s also the single most common hidden leak behind a refrigerator. The pinhole it punches clogs with mineral scale, so people crank the valve harder, and the little rubber seat hardens and weeps.
Nobody notices, because there’s a 300-pound refrigerator parked over it. You find out when the hardwood near the fridge starts cupping.
Many jurisdictions won’t pass them anymore. A plumber cuts in a proper tee and a quarter-turn stop.
7. Grind Rice, Pasta, or Celery in the Garbage Disposal

A disposal isn’t a trash can with a motor. It’s a strainer for the crumbs left after you scrape the plate.
Rice and pasta keep absorbing water past the grind chamber and turn into a paste that sets up in the trap. Celery, artichoke leaves, and corn husks are strings — they wind around the impellers and stall the motor.
Coffee grounds and eggshells don’t jam anything. They just settle into sludge at the bottom of the P-trap and build, which a TODAY roundup of plumber advice put in front of a lot of surprised readers.
Cold water, small amounts, run it fifteen seconds after the noise stops.
8. Go a Decade Without Flushing the Water Heater

Open the drain valve on a ten-year-old tank and what comes out looks like wet concrete.
That’s dissolved mineral falling out of the water and piling on the bottom of the tank. On a gas heater it sits directly between the burner and the water, so the flame has to fight through an insulating crust. The tank rumbles and pops, recovery slows, and the steel overheats where the sediment traps it.
Twenty minutes with a garden hose once a year. On hard water, twice.
9. Leave 10-Year-Old Rubber Washing Machine Hoses On

Go look at yours right now. If they’re black rubber with a crimped collar, they’re on borrowed time.
Those hoses hold full street pressure every second of every day, whether the machine is running or not. The rubber ages from the inside, blisters, and eventually lets go — usually at the connection, usually with nobody home.
A one-inch split at 60 psi moves several hundred gallons an hour. Over a workday that’s thousands of gallons through a laundry room floor, down into a finished basement or through a first-floor ceiling. Insurers consistently rank supply-hose failure among the most expensive non-weather water claims in American homes, and the average payout runs well into five figures once drywall, flooring, and contents are added up.
What plumbers do: braided stainless hoses, which cost about $15 a pair. Then they write the install date on the hose with a Sharpie and replace them every five years regardless of how they look.
And when they leave town, they close the two valves behind the machine. Takes four seconds.
10. Use a Corrugated Accordion-Style P-Trap

You’ve seen these. The flexible ribbed plastic trap that stretches to meet any drain, sold for exactly the awkward install you’re staring at.
Every ridge inside is a shelf. Grease, hair, toothpaste, and coffee film catch on all of them, and the trap packs solid in a matter of months.
A plumber makes the second trip to the store for the right offset tailpiece, or cuts rigid PVC to fit. It takes twenty extra minutes and never comes back.
11. Shrug Off a Slow Drip Under the Sink

A drip is not a small leak that stays small. It’s a schedule.
Week one, a dark ring on the cabinet floor. Week three, the particleboard swells and the laminate skin lifts at the seam. Month two, the swollen board is holding moisture against the back wall of the cabinet, and whatever’s growing there is growing in the dark with no airflow.
By the time you smell it, it’s in the wall cavity, and the conversation moves from a $9 slip-joint washer to a remediation quote.
Here’s the detection trick worth stealing. Dry every joint completely with a rag, then lay a single square of paper towel flat under each connection — the trap nuts, the supply stops, the faucet shanks. Check them in the morning. Paper shows a drip you’d never see on dark wood.
Most of what you’ll find is fixable in ten minutes: a slip nut that backed off, a hardened washer, a loose compression nut. The EPA’s WaterSense program estimates household leaks waste nearly a trillion gallons nationally each year, and most of them are this size.
Call a pro when the water is coming from the wall rather than a fitting, when the leak only shows while the faucet runs under pressure, or when you can already see staining on the ceiling below. Those aren’t washer problems. There are also simple ways to avoid water damage from a leaky faucet before it reaches the cabinet at all.
12. Live With Water Pressure Over 80 PSI

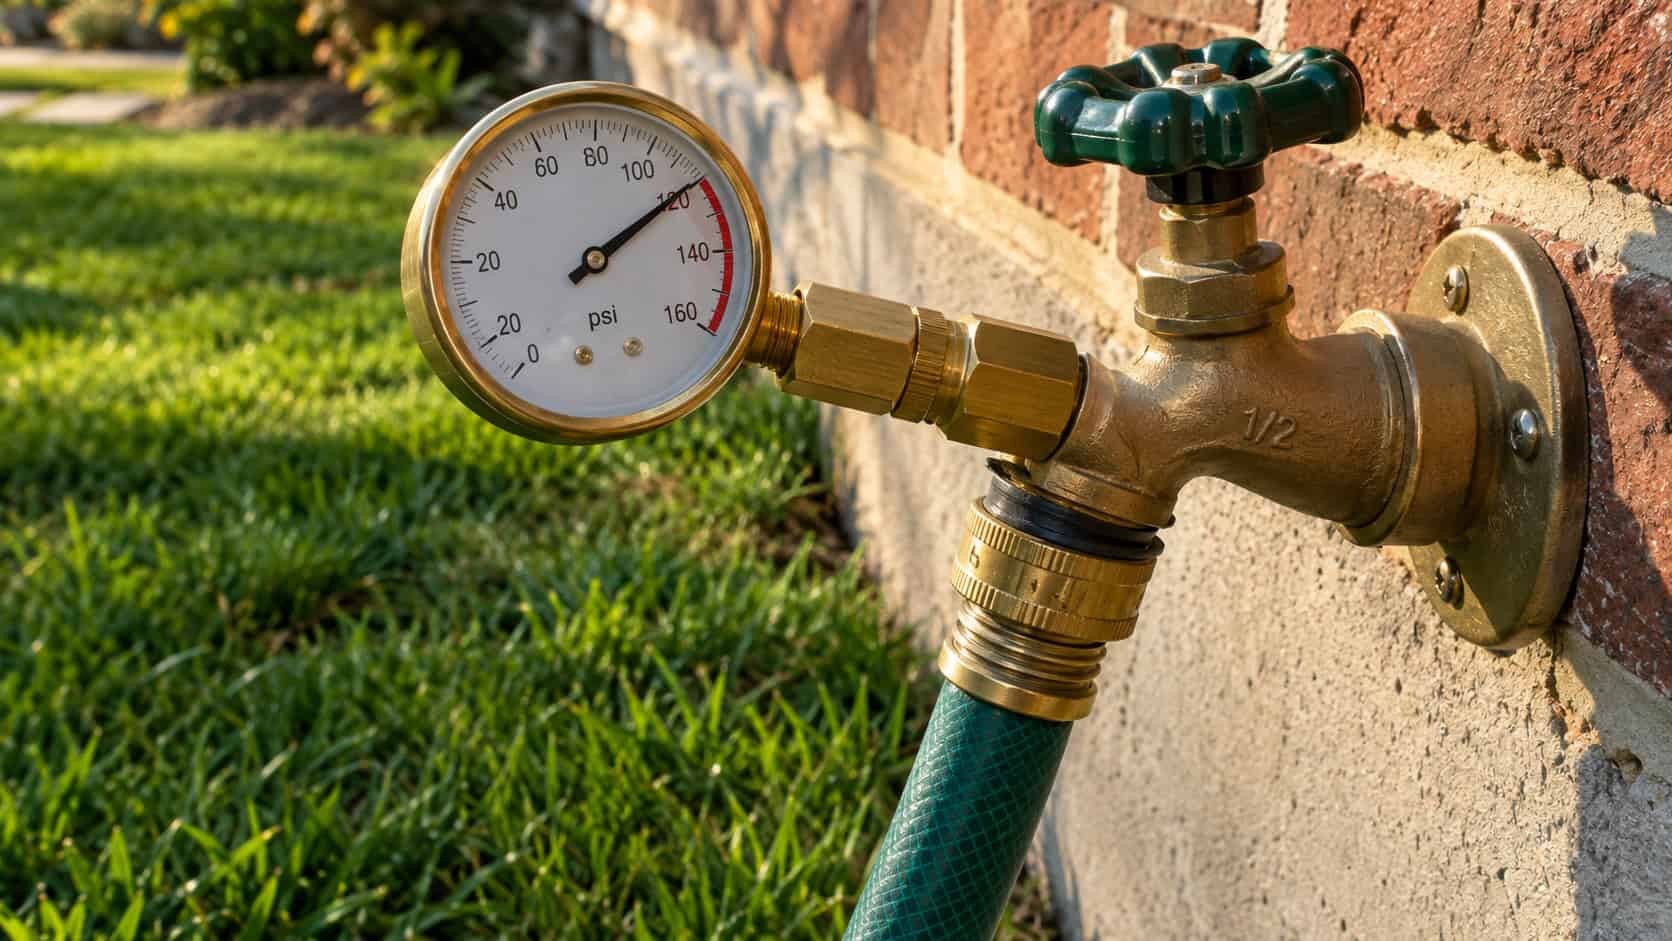
Most homeowners have never measured theirs. Plumbers measure it on the first visit.
Code caps residential pressure at 80 psi, and plenty of municipal systems deliver 90, 100, even 120 at the street to serve hydrants and hillsides. Your fixtures weren’t built for it.
High pressure blows out faucet seats, shortens cartridge life, stresses every supply line in the house, and makes the water heater’s T&P valve weep. It also hammers.
A screw-on gauge at the hose bib costs about $12. If the needle parks past 80, you need a pressure-reducing valve at the main.
13. Reuse an Old Wax Ring When Resetting a Toilet

A wax ring works once. It compresses into the exact shape of that flange at that angle, and once you lift the toilet it will never make that seal again.
The failure is invisible, which is what makes it bad. Water and waste seep out at floor level, under the toilet, into the subfloor. You find out when the tile grout cracks or the floor feels soft underfoot.
The part costs four dollars. Plumbers set a new one every single time the toilet leaves the floor — no exceptions, no judgment calls.
14. Ignore the Anode Rod Until the Tank Rusts Through

Inside your water heater is a steel tank with a thin glass lining and a long magnesium or aluminum rod hanging down the middle.
That rod is designed to corrode so the tank doesn’t. It’s the whole reason a steel vessel full of hot water lasts a decade instead of three years.
When it’s gone, the corrosion moves to the tank walls. There’s no warning stage after that — you get a seam failure and a floor full of water.
Pull and inspect it around year three. A replacement rod is about $30 and often buys another five to ten years from a heater you were otherwise going to replace.
15. Hook Up a Dishwasher Drain With No High Loop or Air Gap

The dishwasher drain hose has to rise up and fasten high under the countertop before it drops to the disposal or tailpiece. That arc is the high loop.
Without it, dirty sink water siphons backward down the hose and sits in the bottom of the dishwasher. Then people blame the machine for smelling, buy cleaning tablets, and never fix the actual cause.
Some jurisdictions require a countertop air gap instead. Either way it’s free to do correctly and takes one zip tie.
A plumber checks the loop on every dishwasher he walks past, including at other people’s houses.
16. Live With an S-Trap Under the Bathroom Sink

Look under an old bathroom vanity. If the trap curves down, up, and then straight down through the floor, that’s an S-trap.
It self-siphons. A full basin draining at once creates enough suction to pull the water right out of the trap behind it, and with the trap empty there’s nothing between your bathroom and the sewer line.
That’s the faint rotten smell in an old powder room that never quite goes away.
Modern code outlawed them. Pros convert to a vented P-trap, or install an approved air admittance valve where running a real vent means opening a wall.
17. Set a Water Heater on a Finished Floor With No Drip Pan

Every tank water heater leaks eventually. The design life is around 8 to 12 years and the failure mode at the end is almost never dramatic — it’s a weep at a seam that turns into a steady run.
The only variable is where that water goes.
In a garage on a slab with a floor drain nearby, it’s a nuisance. In a closet on the second floor, above a bedroom, it’s a ceiling on the carpet and insulation that has to come out.
So plumbers set the tank in a galvanized or plastic pan, pipe the pan’s outlet to a drain or to the outside, and put a $20 battery leak alarm on the floor beside it. Some add a smart shutoff that closes the cold inlet automatically when the sensor goes wet.
Total cost of all three: under a hundred dollars installed if you’re already replacing the heater. Compare that to a water damage claim on a finished ceiling, which routinely runs five figures once drywall, flooring, paint, and contents are counted — before anyone discusses the deductible or what a claim does to your premium.
And check the pan if you have one. Plenty of them were installed with no drain line at all, which means they hold about two gallons and then overflow anyway.
18. Give a Fitting “One More Turn for Good Measure”

This instinct causes more callbacks than any other DIY habit.
Plastic slip nuts crack. Compression ferrules deform past the point of sealing. Tank-to-bowl bolts tightened like lug nuts put a hairline crack in porcelain that opens up two months later.
The damage almost never shows while you’re standing there. It shows in week six as a leak nobody can locate.
Hand-snug, then a measured fraction of a turn with the wrench. Then run water and look.
19. Leave the Garden Hose Screwed On Through a Freeze
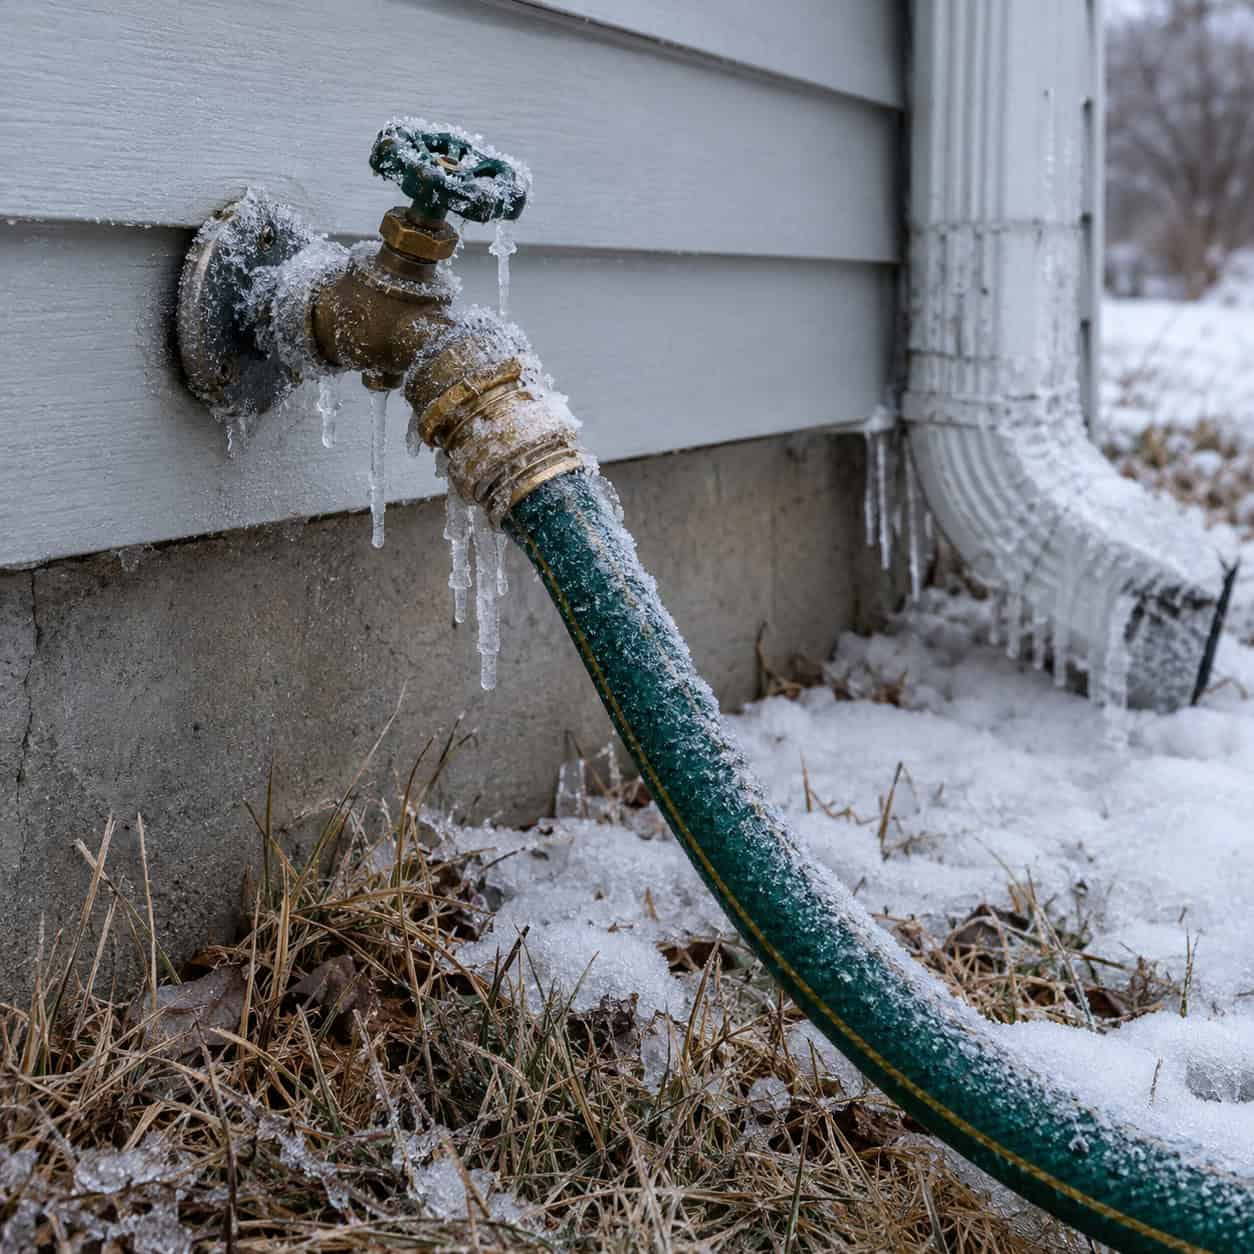
An outdoor spigot is designed to drain. A hose screwed to the end of it defeats that completely.
Water sits trapped in the spigot, freezes, and expands backward into the pipe inside the wall. Frost-free sillcocks don’t save you here — the valve seat is deep in the wall, and the trapped column pushes the ice right back to it.
The split doesn’t leak in January because it’s full of ice. It leaks in April the first time you turn it on, and it leaks inside the wall.
Disconnect in November. Drain the hose, shut the interior valve if you have one, open the spigot.
20. Wrap Teflon Tape Around a Compression Fitting

Tape on everything is the universal signature of amateur work.
Tapered pipe threads — the kind on a galvanized nipple or a shower arm — seal because the threads wedge together, and tape or dope lubricates and fills that wedge. That’s correct.
Compression fittings don’t seal on threads at all. The nut just squeezes a brass ferrule against the tube, metal to metal. Tape on those threads can actually hold the nut off and keep the ferrule from seating square.
Same for the rubber-gasketed nut on a braided supply line. Nothing goes on it. Hand tight and a nudge.
21. Thaw a Frozen Pipe With an Open Flame

A torch on a frozen line does two dangerous things at once.
It can flash the trapped water to steam faster than it can escape, which bursts the pipe you’re trying to save — sometimes violently. And it puts an open flame against framing, old insulation, and dust inside a wall cavity you can’t see into.
Fire departments see a spike in these calls during every hard freeze.
Open the faucet first so melting water has somewhere to go, then work from the faucet end backward with a hair dryer, heat tape, or a space heater. Slow is the whole point.
22. Join Copper to Galvanized Steel Without a Dielectric Union

Put copper directly against galvanized steel with water in between and you’ve built a small battery.
The steel gives up material to the copper. The joint corrodes from the inside out and simultaneously chokes itself with rust scale, so you get falling pressure for years before the actual leak shows up.
It’s the classic mistake in a mid-century house where someone ran new copper to a remodeled bathroom and tied into the old galvanized trunk line.
A dielectric union or a brass transition fitting separates the metals. Though most plumbers will tell you that if you’re already opening the wall, the galvanized should just go.
23. Run the Water Heater Hotter Than It Needs to Be

Most tanks ship set around 140°F. Most plumbers run their own at 120.
The reason is simple arithmetic on burns. At 140°F, water causes a third-degree burn on adult skin in about five seconds — on a child’s thinner skin, considerably faster. At 120 you have minutes.
You also stop paying to hold 50 gallons at a temperature nothing in the house actually needs.
There’s a real counterargument: Legionella bacteria survive better in cooler stored water. Pros who worry about it don’t just crank the tank — they run it hot and install a thermostatic mixing valve at the heater so the water leaving for the fixtures comes out tempered.
24. Leave Gray Polybutylene Pipe in the Walls

Go look at the pipe coming out of your water heater or into the shutoff under a sink. If it’s dull gray plastic, flexible, stamped “PB2110,” stop reading and keep looking.
Polybutylene went into an estimated six to ten million American homes between roughly 1978 and the mid-1990s. It was cheap, fast, and sold as the future of residential plumbing.
Then it started failing. Chlorine in municipal water attacked the pipe wall and the acetal plastic fittings from the inside, making them brittle while the outside still looked perfectly fine. The failures came without warning — no drip, no stain, no slow weep. A fitting would simply let go, often behind drywall, often while nobody was home.
It produced one of the largest class-action settlements in American plumbing history. That settlement fund closed out years ago, so if you have it today, the repipe is on you.
Insurance is now the sharper problem. A number of carriers will surcharge a polybutylene home, exclude water damage from supply-line failure, or decline to write the policy at all. It shows up in home inspections and it shows up in negotiations.
A whole-home repipe in PEX or copper typically runs somewhere between $4,000 and $15,000 depending on square footage, number of baths, slab versus crawlspace, and how much drywall has to come down. It’s a genuinely large number.
Plumbers still do it before the pipe fails, because the alternative is doing it after — with the added cost of flooring, drywall, cabinets, and a claim on your record.
25. Plunge a Toilet With a Flat Cup Plunger

Two plungers, two jobs. Most houses own the wrong one.
The red cup plunger is for flat drains — a sink basin, a tub, a shower pan. It needs a flat surface to seal against, which a toilet does not have.
A toilet needs a flange plunger: the soft rubber sleeve that folds out of the cup and wedges into the trapway. That’s what lets you build actual hydraulic pressure instead of just splashing.
Skip the accordion ones and the bellows gadgets. A plain $10 flange plunger outperforms all of them.
| Cup Plunger | Flange Plunger | |
|---|---|---|
| Shape | Flat rubber dome | Dome plus fold-out sleeve |
| Seals against | Flat drain surface | Curved toilet trapway |
| Use on | Sinks, tubs, showers | Toilets only |
| Typical cost | $5 to $8 | $8 to $14 |
Buy both, keep them in different rooms, and never cross-contaminate.
26. Bury a Shutoff Valve or Cleanout Behind Finished Drywall

Remodels do this constantly. The tile goes up over the tub valve body. The new wainscoting covers the drain cleanout. Everything looks seamless.
Then a cartridge fails in year six, and the repair begins with a reciprocating saw cutting through somebody’s new bathroom.
Plumbers insist on an access panel. Behind the closet, in the hallway wall, under the stairs — ugly is fine, buried is not.
Fifteen dollars of plastic frame now, or demo and a tile guy later.
27. Run a Drain Line Flat (or Too Steep)

Drains need a quarter inch of fall per foot of run. Not more, not less, and this surprises people.
Too flat is obvious — solids stall out in standing water and build up.
Too steep is the counterintuitive one. Pitch the line hard and the water outruns the solids, leaving them stranded on dry pipe to dry out and cement in place. Same clog, different cause.
DIY basement bathrooms get this wrong more than any other installation.
28. Trust an Old Gate Valve That Hasn’t Been Turned in Years
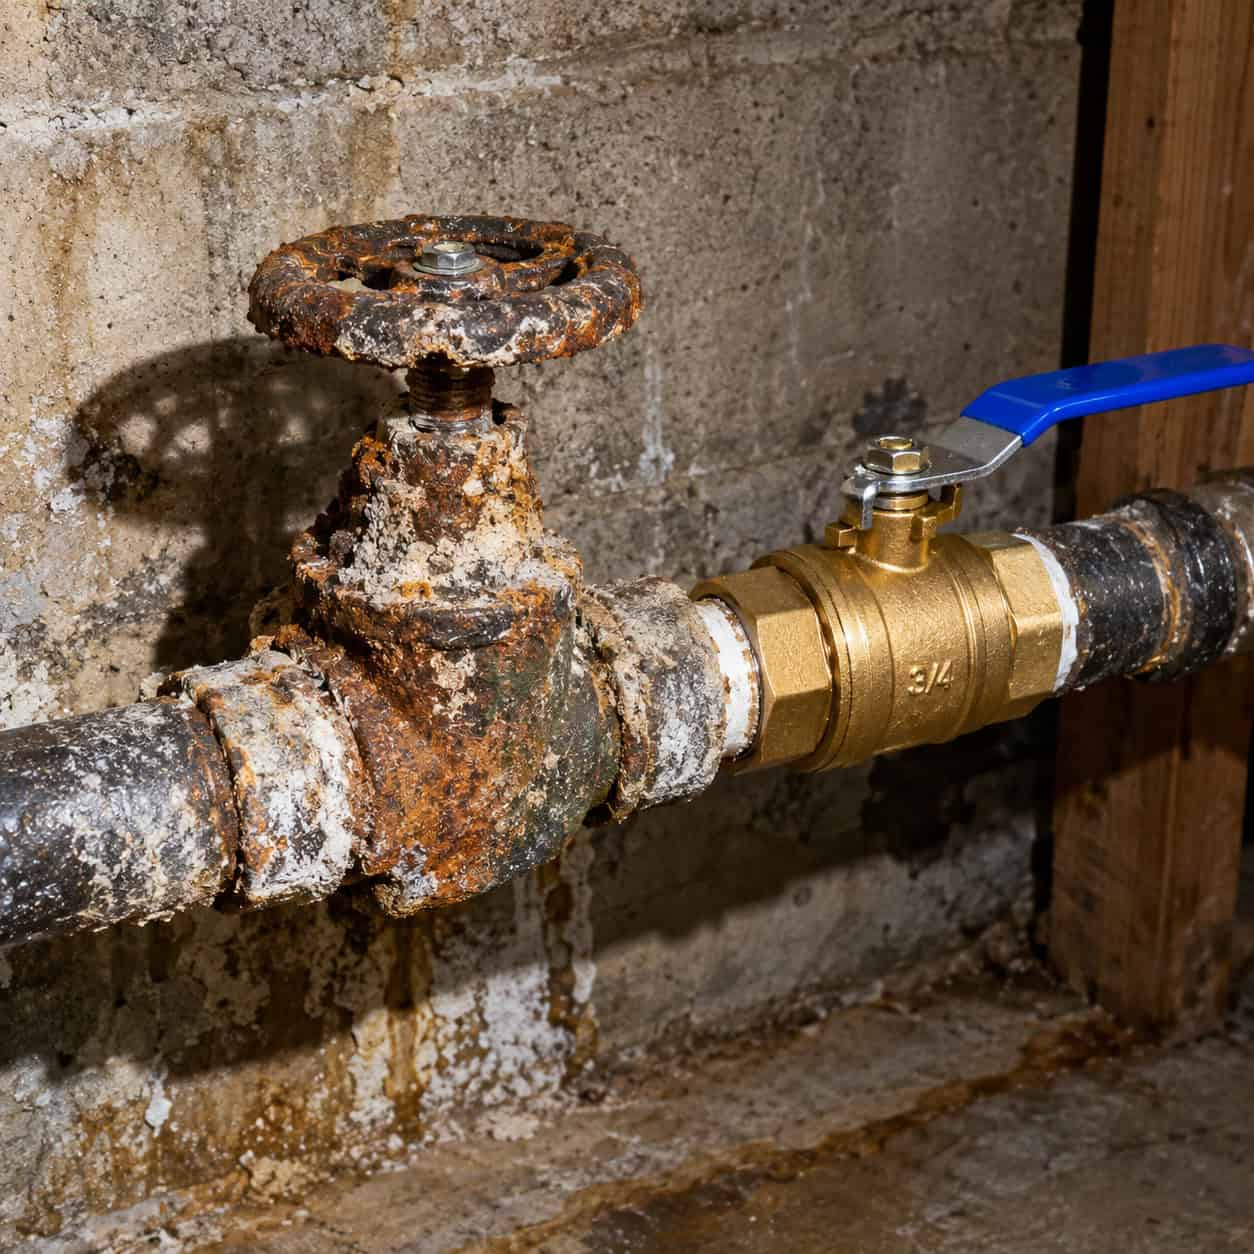
Gate valves are the round multi-turn handles on older mains and fixture stops. They sit untouched for fifteen years and then you need them immediately.
What happens: the stem seizes, the handle snaps off in your hand, or the gate inside corrodes away from the stem so it spins freely and never closes. Sometimes it closes 90% and you’re still fighting a running line.
Plumbers swap to quarter-turn ball valves — handle parallel is open, perpendicular is closed, and you can see the state from across the room.
They also cycle every valve in the house once a year, including the stops under sinks and toilets. Five minutes total.
29. Ignore Gurgling Drains in More Than One Fixture

One slow sink is a local problem. Two fixtures talking to each other is a main line problem.
When the washing machine drains and the toilet across the house bubbles, air is being pushed and pulled through a partially blocked main. The water column has nowhere to go, so it’s venting through your trap seals.
That’s the stage before a backup. You still have options that cost a few hundred dollars instead of a few thousand plus a cleanup crew.
Pros act on the gurgle. Nobody waits for the basement floor drain to prove the point.
30. Patch a Leaking Pipe With Tape and a Hose Clamp and Call It Done

Repair clamps, epoxy putty, and self-fusing silicone tape are legitimate. Every plumber’s van carries them.
They’re for getting you to morning. That’s it.
A pinhole in copper almost never means one bad spot. It means that run of pipe has thinned — from water chemistry, from velocity erosion at a bend, from years of high pressure — and the pinhole is just the first place it got thin enough.
So a pro clamps it tonight and cuts the section out within the week. The clamp that’s been on since 2019 is a leak with a schedule attached.
31. Leave for a Week Without Shutting Off the Main

The worst water damage in residential plumbing doesn’t happen during a dramatic failure. It happens during an ordinary failure in an empty house.
A braided supply line under a bathroom sink lets go on a Tuesday. If you’re home, you hear it and you’ve lost maybe two gallons. If you’re on vacation, that line runs for six days.
At even a modest flow, that’s tens of thousands of gallons. It isn’t a wet floor anymore — it’s saturated subfloor, collapsed ceilings on the level below, buckled hardwood through the whole footprint, and mold that had a week in a closed-up house to establish itself.
Vacation-period water losses are their own category in the claims world for exactly this reason. Duration is the entire variable.
So plumbers shut the main before any trip longer than a long weekend. At minimum they close the washing machine valves and the ice maker stop, which covers the two most common offenders.
They also know exactly where that main handle is without a flashlight, and they’ve turned it recently enough to be sure it works. A main you can’t find at 2 a.m. isn’t a shutoff.
Smart shutoff valves have gotten good and reasonable — roughly $300 to $600 installed, with a flow sensor that closes the line automatically when it sees water running continuously for longer than any normal fixture would. Some insurers discount for them. If you travel often or own a second home, it’s the easiest argument on this list.
32. Let a Guest Bathroom or Floor Drain Trap Dry Out

The only thing standing between your living room and the sewer is a few ounces of water sitting in a bend of pipe.
Stop using that drain and the water evaporates. A month in a dry basement is plenty. Then the smell arrives, and people start hunting for a dead animal in the walls.
Basement floor drains, spare-bath tubs, and laundry sinks in unused rooms are the usual suspects.
Pour a cup of water down any drain you don’t use monthly. Add a tablespoon of mineral oil — it floats on top and slows evaporation for months.
33. DIY the Gas Line to a Water Heater or Range

This is the line even confident DIY plumbers don’t cross. Not because the pipework is difficult — because the failure mode is different.
A water mistake makes a puddle. A gas mistake makes a fire or an explosion, and it can do it weeks after the work, from a joint that passed a casual soap-bubble check but was never actually pressure-tested.
Gas piping is licensed, permitted, and inspected in nearly every jurisdiction in the country, and that’s not bureaucratic friction. The inspection includes a pressure test held over time, verification of pipe sizing against the total BTU load of every appliance on the run, correct sediment traps, approved flexible connectors, and proper bonding.
Sizing is the part homeowners never consider. A line that’s adequate for one appliance starves two, and an appliance running gas-starved produces carbon monoxide.
There’s also an insurance dimension. Unpermitted gas work discovered after a fire gives a carrier a real argument for reducing or denying the claim, and it surfaces again at resale when the inspector asks for permits that don’t exist.
Hire a licensed gas fitter, pull the permit, keep the paperwork. If you ever smell gas, leave the house first and call from outside — don’t flip switches, don’t hunt for the source.
34. Buy a House Without Putting a Camera Down the Sewer Line
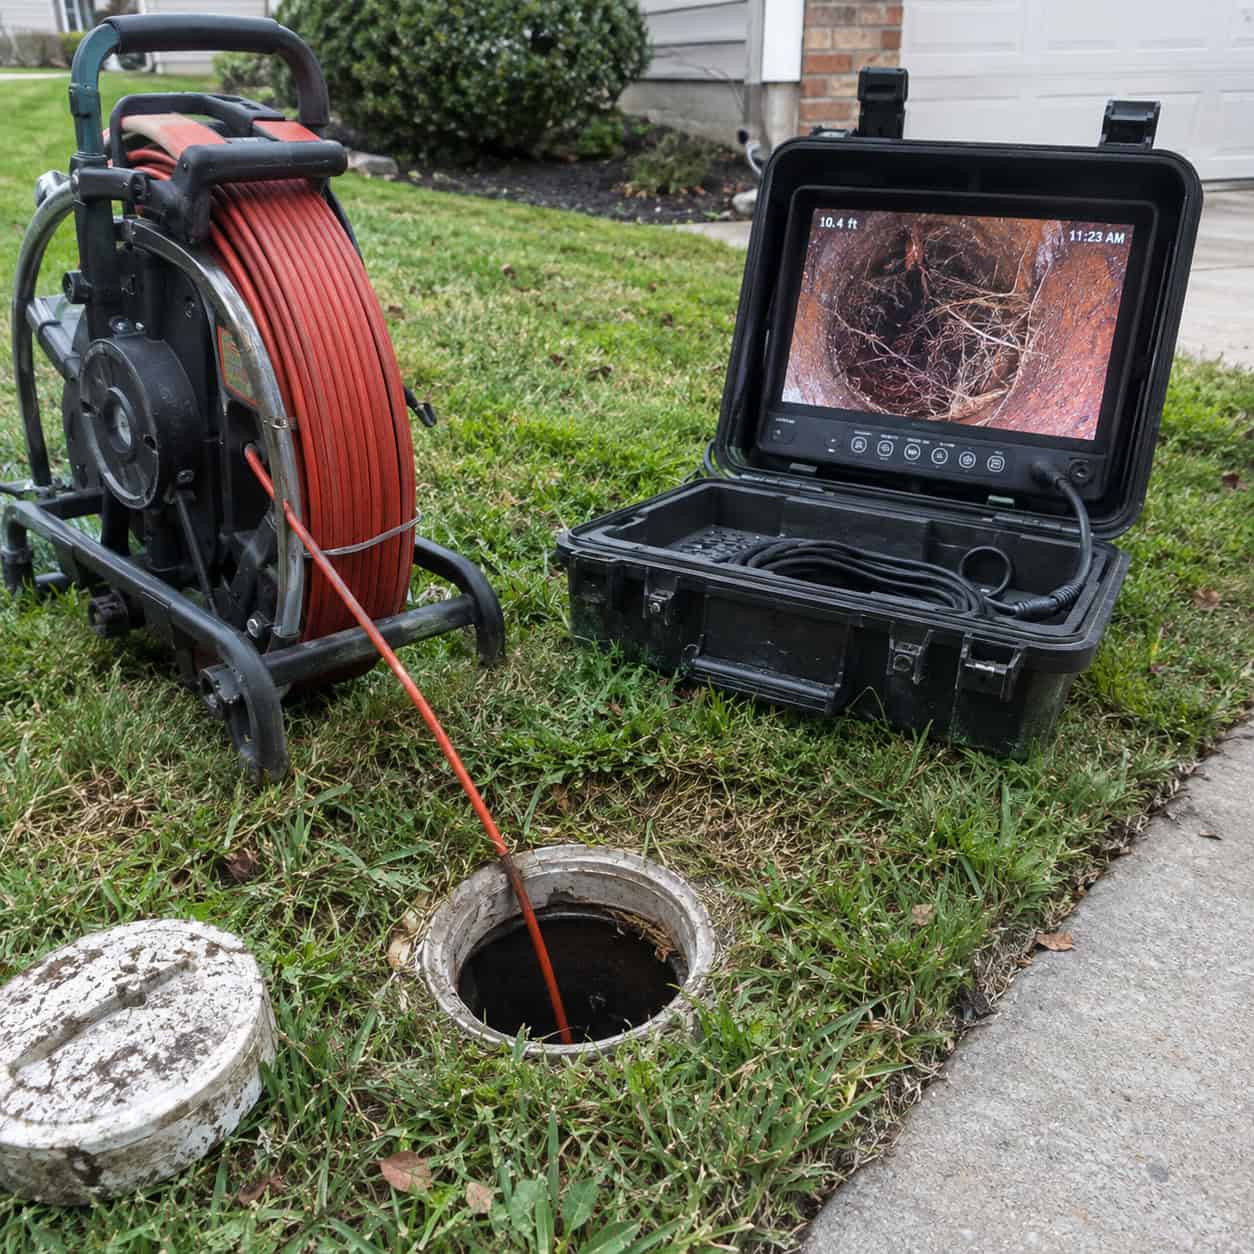
Your home inspector does not look inside the sewer lateral. Almost none of them do, and almost no buyers realize it.
That lateral is the pipe running from your house to the city main at the street, and in most places the homeowner owns all of it — including the portion under the sidewalk and under the road.
Inside it, in an older house, there’s a decent chance of something unpleasant. Tree roots that found a joint and grew into a mat. A belly, where the pipe settled and now holds standing water that catches everything. Orangeburg — tar-impregnated wood fiber pipe used heavily in postwar construction — slowly going oval. Clay tile with the joints separated.
None of it shows up on a walkthrough. Everything flushes fine on inspection day. Then you move in, the house goes from one person’s water use to four, and the line can’t keep up.
A sewer scope costs roughly $200 to $400 and takes under an hour. You get a video file and a written report with distances.
Replacing a lateral costs $5,000 to $25,000 depending on length, depth, and whether it crosses a city street requiring permits, traffic control, and pavement restoration. Trenchless pipe bursting or lining can lower the surface damage but rarely the whole bill.
That’s the math. A few hundred dollars for information, against a five-figure surprise that becomes yours the day you take the keys.
Plumbers scope every house they buy. They also scope the house before they renovate a basement, because nobody wants to find out after the drywall goes up.
35. Let a Bathroom Fan Vent Into the Attic

Pull the attic hatch and look at where the bathroom fan duct goes. In a lot of homes built between the 1970s and the 1990s, it goes nowhere — it just ends, pointed at the insulation.
Every shower pushes warm, saturated air into a cold attic. It condenses on the underside of the roof sheathing, soaks the insulation flat, and feeds mold on the framing.
People spend years fighting a mystery musty smell and replacing a stained ceiling that keeps coming back.
The duct has to run to a roof cap, a gable vent, or a soffit termination with a backdraft damper. Insulated duct, kept short and straight.
36. Install a Water Softener With No Bypass Loop

A softener needs service. The valve head fails, the resin fouls, the brine tank bridges — and when it does, the whole house has no water until it’s fixed.
A bypass loop is three valves that let you route water around the unit and carry on living while you deal with it. Most softeners ship with an integral bypass, but the plumbed loop is better because it survives the softener itself.
It also lets you water the garden and fill the pool with unsoftened water, which saves salt and is better for plants anyway.
Fifteen minutes of extra pipe at install. A plumber would never skip it.
Not one of these is exotic. They’re ordinary decisions, made under mild time pressure, by people who had no particular reason to know better.
Which is the useful part. A plumber’s advantage isn’t special knowledge — it’s having been called back to the same five mistakes enough times to stop making them.
Pick three off this list that apply to your house. The hoses, the water pressure, the main shutoff you’ve never located.
Water always finds the cheapest thing you own and ruins the expensive thing underneath it.