

A laundry closet looks like the easiest room in the house to plan. Two appliances, four walls, a door.
Then the washer arrives and the door won’t shut. The dryer takes three cycles. Something smells like a wet towel that never dried.
Most of these failures trace back to a decision made months earlier, usually by somebody holding a tape measure in the wrong spot. The appliances aren’t the problem. The box around them is.
And because a closet hides everything — the hoses, the duct, the puddle — the mistakes stay invisible until they’re expensive.
Here are 31 laundry closet choices that come back to bite, and what to do instead.
1. Measuring the Closet Opening Instead of the Full Depth

Nearly every laundry closet disaster starts with a tape measure that stopped at the drywall.
A standard front-loader runs about 31 inches deep. Behind it you need another 4 to 6 inches for fill hoses, the drain standpipe, and the dryer’s vent elbow — and the hoses don’t fold flat no matter how hard you push.
Add roughly an inch of air on each side so the machine isn’t pinned against the framing. That’s a 37-inch closet for a 31-inch appliance.
2. Bifold Doors That Scrape the Washer Door

Builders install bifolds because they’re cheap and they fold out of the way. In a laundry closet they fold straight into the one place you need clear.
The panels pivot inward past the jamb. A front-loader’s door, or even the detergent drawer, sits right in that arc — so the hinge knuckle gouges the appliance and the door never closes flush again.
Homeowners on DIY Chatroom describe the same ending over and over: the bifolds get taken off the track and leaned against a wall in the garage.
Pocket doors or a barn-style slider on the outside of the wall cost more and solve it permanently.
3. Skipping the Drain Pan (and the Pan’s Drain Line)

The residential code doesn’t require a washer pan. So builders skip it, and almost nobody asks.
That’s fine until the closet sits over a finished ceiling. A supply hose lets go at 60 psi and pushes several gallons a minute onto a floor that was never designed to hold water.
Here’s the part people miss: a pan with no plumbed drain line is a bathtub with no drain. Most hold two to four gallons. A burst hose fills that in under a minute, and then the water goes exactly where it was always going.
The pan has to be piped — typically 1-inch PVC running to a floor drain, a laundry sink tailpiece, or outside through a rim joist. Appliance installers like AAA Appliance Service Center treat the pan and its drain as one part, not two options.
Dollar framing makes this easy. A steel or heavy polymer pan runs $30 to $70. Plumbing the drain line adds maybe $200 to $400 if a plumber’s already on site. A second-floor laundry flood that reaches drywall, insulation, and flooring below routinely lands between $3,000 and $15,000 once remediation and dry-out are included — and insurers increasingly argue about gradual seepage.
Install the pan before the machines go in. Once a stacked pair is wedged into a 30-inch closet, retrofitting one means pulling everything back out.
4. Stacking Without the Manufacturer’s Stacking Kit

A dryer weighs maybe 120 pounds. A washer on final spin generates enough lateral force to walk across a floor.
Put one on top of the other with nothing connecting them and physics takes over. The dryer creeps forward an eighth of an inch per load until the day it doesn’t stop.
Stacking brackets are model-specific for a reason — they tie into molded points on both chassis. Universal straps from the hardware aisle and “it’s heavy enough” are the two excuses that end with a dryer on the floor and a bent vent duct.
The kit costs $30 to $60. Buy it with the appliances.
5. Flexible Foil Dryer Duct Crushed Behind the Machine

In a shallow closet, the only way to push the dryer back against the wall is to flatten the transition duct behind it.
Accordion foil collapses into something the size of a pancake. Airflow drops, drying time doubles, and lint settles in every ridge against a surface that runs hot.
InterNACHI flags crushed and kinked transition ducts as a leading contributor to dryer fires, and the thin foil type is the worst offender.
A rigid aluminum periscope vent is the fix. It’s a flat metal box that sits in two or three inches of space and lets the dryer slide almost flush. Nobody at the appliance store will mention it.
6. The Wire Shelf Mounted Too Low Over the Machines

Builders hang that shelf at a height that worked for a 36-inch top-loader in 1998.
Put a modern top-loader under it and the lid hits. Put a stacked pair under it and it covers the dryer’s control panel.
It also creates a shelf-edge trap where detergent bottles tip backward into the two-inch gap behind the machines, never to be seen again.
If you keep a shelf, mount it at least 18 inches above the appliance tops, and add a small lip or back rail.
7. Shutoff Valves You Can Only Reach by Dragging the Washer Out

Two hose bibs on the back wall, four inches behind a machine wedged into a 30-inch closet. That’s the standard install.
Nobody shuts those off between loads, which is the whole point of having them. Worse, nobody can shut them off during a failure — which is the moment they actually matter.
A recessed washer box with a single-lever shutoff solves both. One handle, reachable from the front, and the box sits inside the stud bay instead of on top of it. That alone recovers close to three inches of closet depth, which in this category is real money.
Design guides like ClearClosets treat the recessed box as baseline for closet laundry, not an upgrade.
8. Front-Loader Doors That Swing Into a 36-Inch Hallway

A front-loader door is roughly two feet of glass on a hinge, and it swings a quarter circle.
In a hallway closet, that arc eats the entire corridor. Open the washer and nobody gets past.
Worse case: the door hits the opposite wall before it opens far enough to load comfortably, so you’re feeding wet towels through a 70-degree gap.
Check hinge side against hallway width before you order. Some brands let you specify; most don’t let you reverse a washer door after the fact.
9. Keeping the Black Rubber Fill Hoses

Those molded black hoses that came with the machine twenty years ago are still holding back full house pressure, 24 hours a day.
Rubber hardens. It cracks at the crimp first, usually on the hot side.
Burst supply hoses sit near the top of every insurer’s list of homeowner water-damage claims, and a closet is the single worst place for one — the failure happens four inches behind a machine nobody can see past.
Braided stainless with a stamped manufacture date runs about $15 a pair. Auto-shutoff hoses with a flow-sensing valve run $30 to $50 and close themselves when flow spikes. Replace both at the five-year mark whether they look bad or not. The same logic that prevents water damage from a leaky faucet applies here, just with far more volume behind it.
10. A Solid Slab Door With No Louvers or Air Gap

The design instinct is understandable. A flat painted slab makes the laundry disappear into the hallway.
It also seals a heat-and-humidity generator inside a drywall box.
Run the numbers on what a laundry closet actually produces. A washer leaves two to three gallons of water in a load of wet clothes, and the drum, gasket, and dispenser hold moisture for hours after the cycle ends. An electric dryer that isn’t venting perfectly pushes warm, damp air into the room around it. Close the door on all of that and the humidity has nowhere to go.
What shows up first is smell — that sour gasket odor on a front-loader, strongest on Monday morning. Then paint starts to peel at the top of the back wall. Then mildew blooms along the baseboard where condensation collects on the coolest surface in the box.
Behind the drywall it’s worse, because the paper facing on gypsum board is organic and holds mold readily at sustained humidity above roughly 60 percent. You don’t see that stage. You smell it.
Louvered doors are the simple answer, and they’re why builders used them for decades before slab doors got fashionable. If you want the clean look, undercut the door by an inch and add a transfer grille high on the closet wall so air can actually cycle through — low in, high out.
A small exhaust fan ducted to the exterior is the upgrade for a windowless interior closet. If the musty smell lingers after you’ve improved airflow and left the washer door cracked between loads, that’s the point to get the wall cavity checked rather than keep repainting.
Guides like ClearClosets put ventilation ahead of storage in closet laundry planning. Storage is comfort. Airflow is the building envelope.
11. Dryer Controls Stacked Above Your Reach

Stack a dryer on a washer and the control panel lands somewhere around 68 to 72 inches off the floor.
That’s fine if you’re six feet tall. It’s a step stool every single load if you’re five-two, and modern panels are flat capacitive buttons with low-contrast labels you have to read, not feel.
Owners quoted by SlashGear describe keeping a stool permanently parked in the hallway.
Measure to your own eye level at the appliance store. Then decide.
12. Carpet or Bare Subfloor Inside the Closet
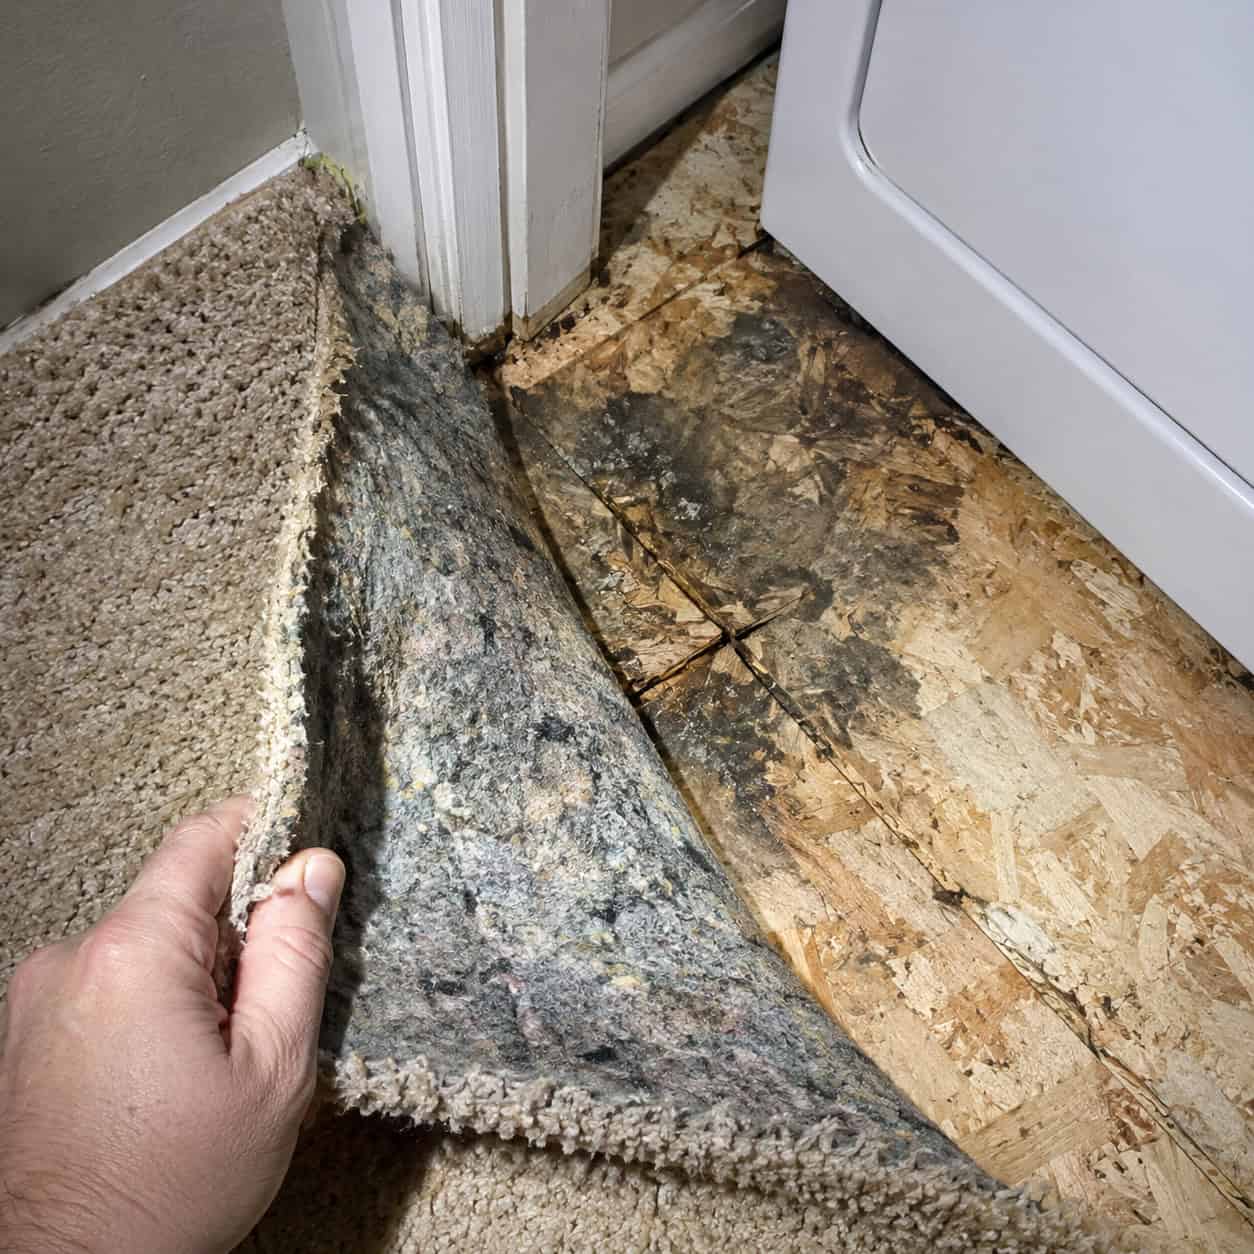
Walk through any house built between 1975 and 2005 and you’ll find laundry closets where the hallway carpet runs right under the washer.
Carpet is a sponge with a second sponge glued to the bottom. A slow drip at a hose connection never puddles, never shows, and never evaporates — it wicks into the pad and spreads sideways through the jute backing.
By the time anyone notices, the smell is coming from a two-foot circle of pad that’s been damp for months, and the OSB underneath has swelled at the seams.
Bare subfloor isn’t much better. Unsealed OSB drinks water and delaminates, and particleboard underlayment turns to oatmeal.
The right surface is sheet vinyl or tile with sealed seams, carried a few inches up the back and side walls like a shallow pan. Luxury vinyl plank works if the seams are waterproof-rated and you silicone the perimeter. The goal is a surface where a leak sits visible on top instead of disappearing underneath.
If you’re already living with carpet in there, pull it back and look before you decide it’s fine. Damp pad has a specific gray-brown staining pattern and a smell you’ll recognize instantly.
13. A Vent Run With Too Many Elbows to Breathe

An interior laundry closet has no exterior wall, so the duct has to travel — up into a joist bay, across the house, out through a soffit or a rim joist.
Every turn costs you. Code caps total duct length and then deducts equivalent feet for each elbow, and the deduction isn’t small: a 90-degree turn can count as five feet or more depending on radius. The IRC exhaust systems chapter spells out the math.
Four elbows and twenty feet of straight duct can blow past the limit before the vent ever reaches daylight.
That’s the hidden reason some closet dryers need three cycles for a load of towels. It isn’t the dryer.
Sweep elbows instead of hard 90s, rigid metal instead of flex, and the shortest route to the exterior — even if it means cutting through a less convenient wall.
14. Running Laundry Off a Shared Circuit or an Extension Cord

Retrofit closets are where electrical corners get cut, because running new circuits through finished walls is the expensive part.
A washer wants its own 20-amp circuit. An electric dryer wants a dedicated 240-volt, 30-amp circuit with its own breaker. Neither of those is negotiable, and neither is satisfied by the hallway receptacle that’s already feeding two bedrooms.
An extension cord on a dryer is worse than a shared circuit. The cord heats, the connection arcs, and it sits in a lint-filled box.
The Consumer Product Safety Commission has been publishing dryer fire guidance on this for years. Pay the electrician.
15. A Rough Opening Too Narrow for the Next Washer

Appliances got wider. Closet doorways didn’t.
A 27-inch machine isn’t 27 inches once you count the control bezel, the door handle, and the shipping blanket the delivery crew wraps it in. A 28-inch opening means the casing comes off. A 30-inch opening is tight.
Plan for 32 to 33 inches of clear opening — measured between the finished jambs, not the framing.
This one only shows up the day the old washer dies, which is the worst possible day to discover it.
16. A Standpipe at the Wrong Height With No Trap

Modern washer pumps discharge hard — fast enough to push water back up a short standpipe and onto the floor.
Four things go wrong here, and amateur retrofits usually manage at least two:
- Too short, and the discharge overflows the top
- Too tall, and the pump strains against the head pressure
- No P-trap, and the closet breathes sewer gas every time the trap would have sealed it
- Undersized at 1.5 inches, and it simply can’t swallow the flow rate
General guidance puts the standpipe top somewhere between 30 and 42 inches above the floor, with the trap no more than about 18 inches below the inlet. A 2-inch pipe handles modern pumps far better than the old 1.5-inch standard.
Confirm against your local code before you cut anything — jurisdictions vary on heights and trap arm length.
17. No Light Inside the Closet

Open the door and your own body blocks the hallway light. Now you’re sorting darks by feel.
That’s how a stain goes through the dryer and sets permanently. It’s also how a puddle under the washer sits unnoticed for three weeks.
Designers surveyed by Homes & Gardens rank bad lighting among the top small-laundry failures, ahead of storage.
A battery puck light takes ten minutes and two screws. A switched LED strip under the shelf takes an afternoon. Either beats what you have.
18. The Indoor Venting Kit With the Water Bucket

Big box stores sell a plastic box with a filter screen and a reservoir. It promises to let you run a dryer with no exterior vent.
What it actually does is dump roughly a gallon of water vapor per load into a sealed closet, along with whatever lint the screen misses.
That’s a humidifier aimed at your drywall. In a small interior closet it produces mildew on a schedule you could set a clock by.
And for a gas dryer it’s prohibited outright — combustion byproducts including carbon monoxide have to go outside, period.
If there’s genuinely no path to an exterior wall, a ventless heat pump dryer is the real answer. It condenses moisture and drains it. It costs more and dries slower, but it doesn’t flood the room with steam.
19. Pedestals That Push the Door Past the Header

The appliance salesperson will offer pedestals as a storage upgrade. In a real laundry room they’re great — they raise the door to a comfortable height and add a drawer.
In a closet they add 12 to 15 inches of height you may not have.
Two failure modes. A single front-loader on a pedestal can lift the top of the door opening above the closet header, so the door physically can’t clear. And a stacked pair on pedestals won’t fit under an 80-inch opening at all.
Measure header height before anyone writes up the order.
20. A Gas Dryer Sealed Into an Airtight Closet

This is the entry where getting it wrong doesn’t just cost money.
A gas dryer burns fuel. It needs combustion air to do that, and it needs makeup air to replace everything the blower pushes out the vent — a dryer can move 150 to 200 cubic feet of air per minute, and all of it has to come from somewhere.
Seal the closet and the dryer starts pulling against a vacuum. Combustion goes incomplete. The flue can backdraft, pushing exhaust into the closet instead of out the vent, and that exhaust contains carbon monoxide.
Manufacturers know this, which is why gas dryer installation manuals specify minimum free-air area for closet installs — commonly expressed as a required square-inch opening near the floor and another near the ceiling. Those numbers are model-specific. They are in the manual nobody reads.
Louvered doors sized to that spec, or a combination of door undercut plus a high transfer grille, is the usual solution. A solid slab door on a gas dryer closet is not a style choice.
Put a carbon monoxide alarm in the adjacent hallway regardless, and keep it on a different circuit than the laundry.
Use a licensed installer for the gas connection. Flexible connectors, sediment traps, and shutoff placement are all code-governed, and a hand-tightened flare fitting behind a machine you can’t reach is not a DIY win.
21. Bypass Sliders That Only Ever Show Half the Closet

After the bifolds fail, the common fix is a pair of sliding bypass doors on a track. They solve the swing problem completely.
Then you discover the new problem: you can only ever open half the closet.
Two appliances, one accessible at a time. Transferring a load means sliding a panel back and forth, and the panel always seems to be covering the machine you need.
In a two-appliance closet that’s a tax you pay twice per load, forever. A pocket door or an exterior-mounted slider that clears the full opening is worth the extra framing.
22. Nowhere to Set a Basket Down

A side-by-side pair gives you a flat 54-inch surface to fold on, set a basket on, and stage detergent. Stacking takes all of it away.
A closet has no counter to replace it, and no floor space to set a basket that isn’t in the doorway.
So wet laundry goes on the hallway floor. Every time.
A pull-out shelf mounted between the machines and the door, or a wall-hinged drop-down board that folds flat when not in use, costs under $100 and changes how the space works.
23. Setting Machines on a Springy Floor With No Leveling

A front-loader spins at 1,200 RPM or faster. That energy goes somewhere.
On a second-floor or over-garage closet, it goes straight into the joists, and a hard-walled closet amplifies it like a speaker cabinet. The whole house hears the final spin.
An unlevel machine is worse — the drum wobbles, the chassis knocks the side walls, and you get the washing machine shaking like crazy problem that people assume means a broken bearing.
Level all four feet with an actual level, not by eye. Add anti-vibration pads under each foot. For a bouncy floor, a sheet of ¾-inch plywood under the pair spreads the load across more joists and kills a surprising amount of drumming.
24. Not Reversing the Dryer Door

Most dryer doors are field-reversible. Four or six screws, swap the hinge to the other side, move the strike plate.
In a tight closet the hinge side determines whether you transfer clothes straight across an open gap, or reach around a door panel standing between the two machines.
Delivery crews install it however it came out of the box. Nobody asks.
Five minutes at install. A decade of annoyance if you skip it.
25. Sharing the Closet With the Water Heater or Furnace

Condos, townhomes, and a lot of 1980s builds put the laundry and the mechanicals in the same box to save square footage.
Three things go wrong at once. Service clearances disappear, so the next water heater replacement means pulling the washer out first. Lint drifts toward a burner or a pilot assembly. And you now have two independent flood sources standing over the same patch of floor.
A water heater fails in a specific way — slowly at first, then all at once, 40 to 50 gallons.
If this is your layout, the closet needs a pan under the washer, a pan under the water heater, and both piped to a drain. Keep the required clearance around the appliance nameplate and don’t stack storage on top of the heater.
26. Buying an All-in-One Combo to Dodge the Problem

A washer-dryer combo looks like it solves everything. One machine, one footprint, no vent required.
The tradeoffs are real and worth knowing before you commit.
Combined wash-and-dry cycles routinely run three to four-plus hours, because condenser drying is slow. Dry capacity is usually smaller than wash capacity, so a full wash load won’t dry completely in one pass. And a single machine means a single point of failure — when it goes down, you have no washer and no dryer.
For a one-bedroom condo where the alternative is a laundromat, that math works fine. For a family doing eight loads a week, it won’t.
Newer heat pump combos have narrowed the gap on cycle time. Read the actual rated dry capacity, not the drum volume.
27. A Laundry Closet Sharing a Wall With a Bedroom

Open-plan builds love putting the laundry closet in the bedroom hallway. It’s convenient right up until bedtime.
An empty stud bay between a spin cycle and a headboard transmits sound almost perfectly. The result is a household rule nobody chose: no laundry after 8 p.m.
During construction, the fix is cheap. Mineral wool batts in the shared wall, a solid-core door instead of hollow, and resilient channel on the bedroom side if you’re framing anyway. Maybe $300 in materials.
Retrofitting any of that means opening a wall. Which is why most people just live with the rule.
28. No Leak Detector Under the Machine

A closet hides a slow leak better than any room in the house.
Think about what a small drip actually does in there. A hose fitting weeps a few ounces an hour behind a machine nobody moves. If there’s a pan, it fills over weeks. If there isn’t, the water tracks along the subfloor, finds the lowest point, and soaks into framing. The first sign is a brown ring on the ceiling below — by which point the subfloor has been wet for a month.
A $20 battery leak sensor sitting in the pan changes that entirely. It screams at 100 decibels the moment the contacts get wet.
Wi-Fi sensors in the $30 to $50 range push a phone alert, which matters because the alarm in a closed closet behind a closed door isn’t loud enough to wake anybody. If you travel at all, this is the version to buy.
The full version is an automatic shutoff system: a motorized ball valve on the laundry supply lines, tied to one or more sensors. Water hits the sensor, the valve closes, the leak stops. Installed cost runs roughly $300 to $800 depending on whether you’re valving just the laundry or the whole house service line.
Several insurers offer premium credits for whole-home automatic shutoff systems — typically in the 5 to 10 percent range on the dwelling portion. Call and ask before you buy, because the qualifying product list varies.
One sensor in the pan. One behind the machines at the low point of the floor. That’s the entire argument of this article compressed into about forty dollars of plastic.
29. Skipping a Dryer Vent Cleanout Access Point
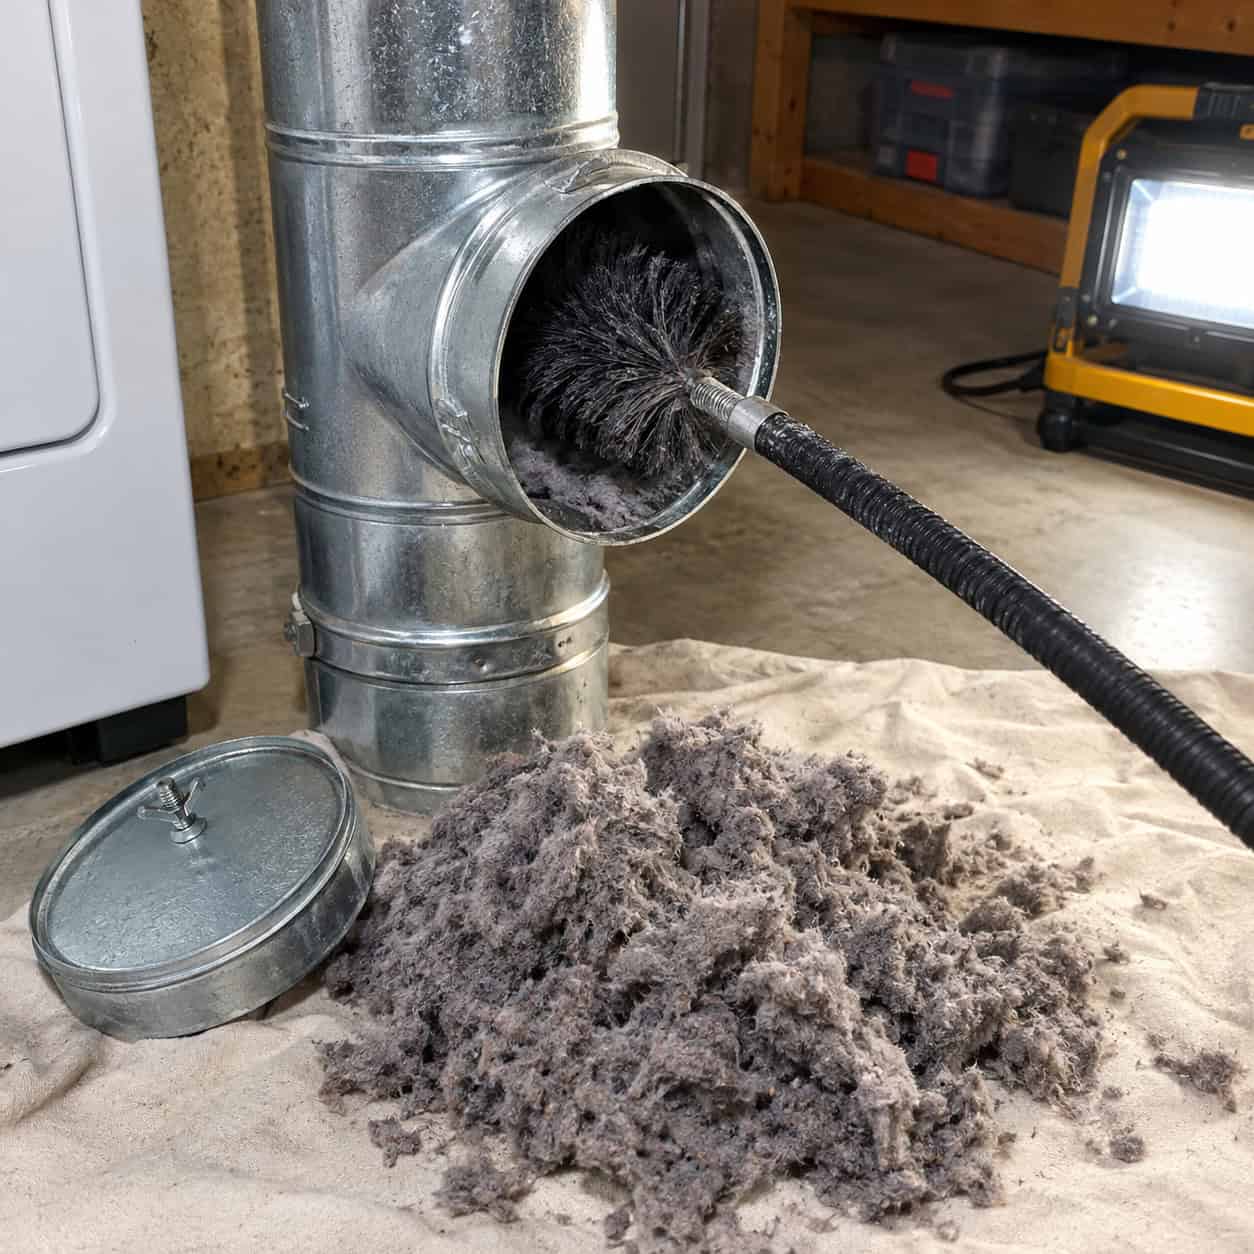
A straight six-foot duct through an exterior wall cleans itself mostly, and you can brush it from outside in ten minutes.
An interior closet with 25 feet of duct running through a joist bay has no such option. Lint accumulates at every turn and there’s no way to reach it without opening drywall.
So plan the access during installation. A removable cleanout tee at the first elbow, or a ceiling access panel where the duct turns, costs almost nothing when the wall is open.
Without it, the maintenance just doesn’t happen — which is how a long interior duct becomes a fire load nobody has inspected in fifteen years.
30. No Utility Sink or Bucket Drain Anywhere Nearby

You find out you needed one the first time you have to rinse a paint roller, soak a stained shirt, or empty a dehumidifier bucket.
In a bedroom-wing laundry closet, the nearest option is usually a bathroom sink you don’t want to put bleach in, or a kitchen sink two rooms away.
A true closet rarely has room for a utility basin. But a laundry faucet or a hose bib tapped off the washer supply, discharging into the standpipe, covers most of the need in about a square foot.
If you’re already planning plumbing, it’s worth knowing how laundry faucets differ from kitchen faucets — the threading and mounting aren’t interchangeable.
31. Tiling Only the Visible Floor Strip

Flip renovations do this constantly. The tile stops at the door line because nobody will see the floor under the machines anyway.
Now the appliances sit three-eighths of an inch lower than the finished floor, on a different plane, with a ledge at the threshold.
Leveling becomes guesswork, the machines rock, and sliding the washer out catches the tile edge and chips it.
There’s a second cost: the unfinished strip under the appliances is usually bare subfloor, so you’ve reintroduced the absorbent surface problem right where every leak starts.
Run the flooring wall to wall. It’s maybe eight extra square feet.
A laundry closet is a mechanical room pretending to be a coat closet. Water under pressure, 240 volts, a heat source, and a few hundred pounds of vibrating steel, all behind one hollow-core door.
Almost none of these fixes are expensive if you make them before the appliances arrive. Almost all of them are miserable afterward.
Measure the depth. Pan it and drain it. Let it breathe.
Then put a twenty-dollar sensor on the floor and forget about it for ten years.